
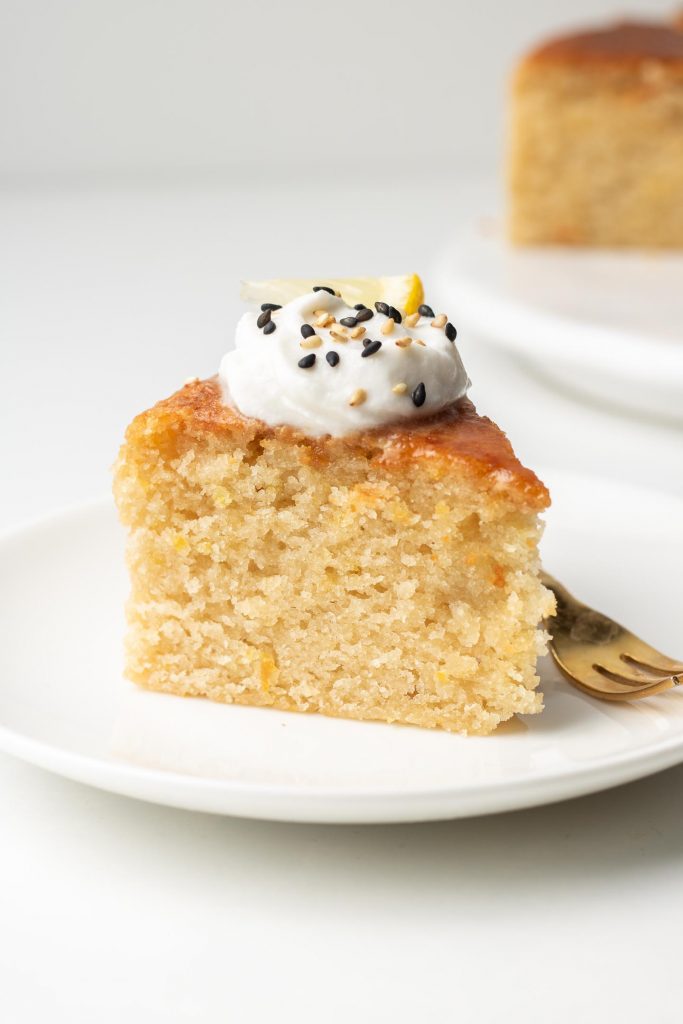
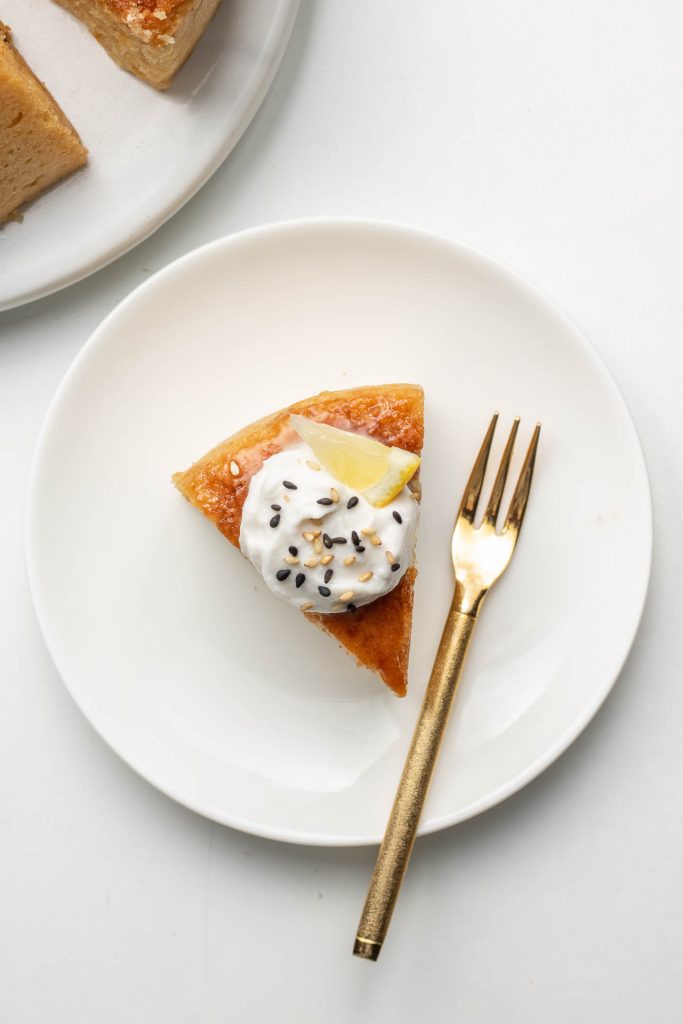
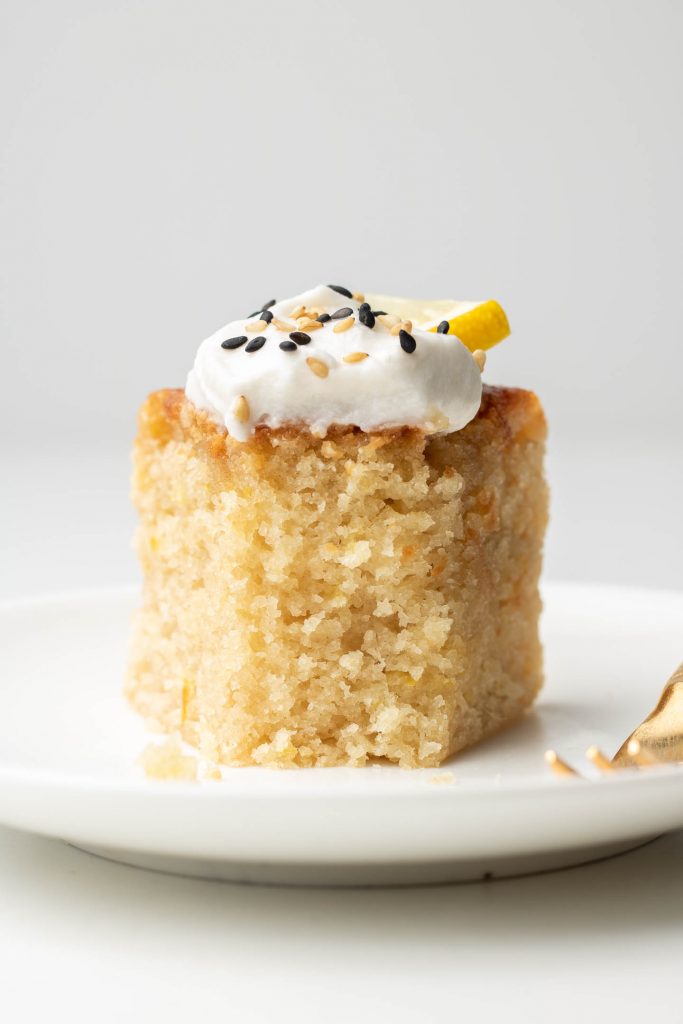
My new FAVOURITE lemon dessert EVERRRR: Sesame Oil Lemon Cake with Burnt Sugar Syrup and topped with vanilla whipped cream. Deep, rich & nutty flavours of the sesame oil paired with citrusy bright lemon, infused in the most moist and tender cake.
Hi, hello to all my lemon loverrrrssss!!
ok I can’t be the only person who doesn’t have olive oil in their kitchen 🤨 with a slight olive oil cake fomo-inspiration, I figured there’s gotta be room for sesame oil in cake too right?
OhEMGEE. I am happy to report that yes, YES!! Sesame oil belongs in cake… ok well, this citrusy cake at least. 😌
This cake has the perfect amount of rich, nutty sesame flavour + citrusy lemon, balanced with some almond flour that gives it a buttery flavour and most perfect moist crumb texture, and burnt sugar syrup adds a subtle nutty, toasty sweetness & don’t forget the whip cream!! or you will be sad 5eva.
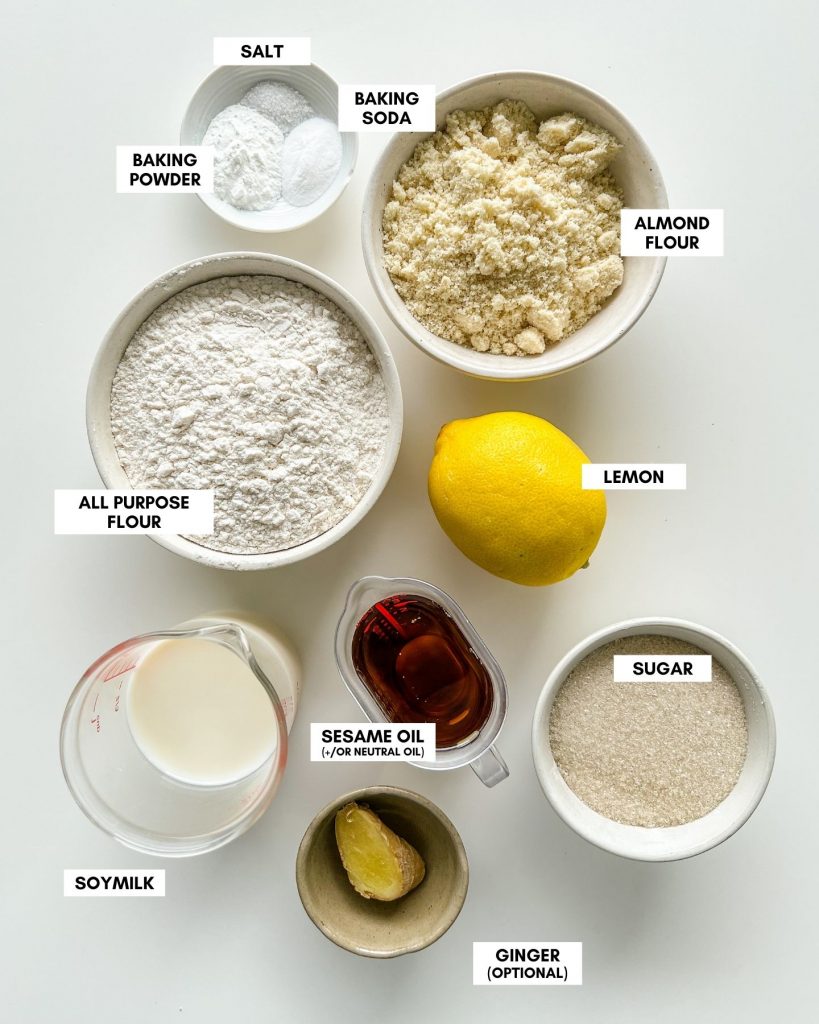
Ingredients for Sesame Oil Cake (+Substitutions)
For the sesame oil lemon cake:
- all purpose flour: I have not tested with any other kinds of flour, so cannot recommend substitutions, but if you do try any others, I’d love to know!!
- baking powder & baking soda
- super fine almond flour: don’t skip this ingredient!! it adds that rich buttery flavour and balances the strong flavour of sesame oil. if you use almond meal, it will just be slightly more crumbly.
- soy milk: it has more fat and protein than other non-dairy milks, making the cake richer. However, you can opt to use oat milk, or any other higher protein and fat milk.
- sesame oil: I’ve tried it with 3 full tablespoons of sesame oil and 2 tbsp sesame oil + 1 tbsp neutral oil- if you like strong flavours use 3 tbsp but if you prefer a subtle aroma of sesame oil use 2 tbsp.
- sugar
- lemon: both the juice & zest.
- xanthum gum: optional, but it will keep the crumb a little tighter (pictured cake did not contain xanthum gum).
For the burnt sugar syrup:
- cane sugar
- water: both room temp & just HOT water
How to Make Sesame Oil Cake
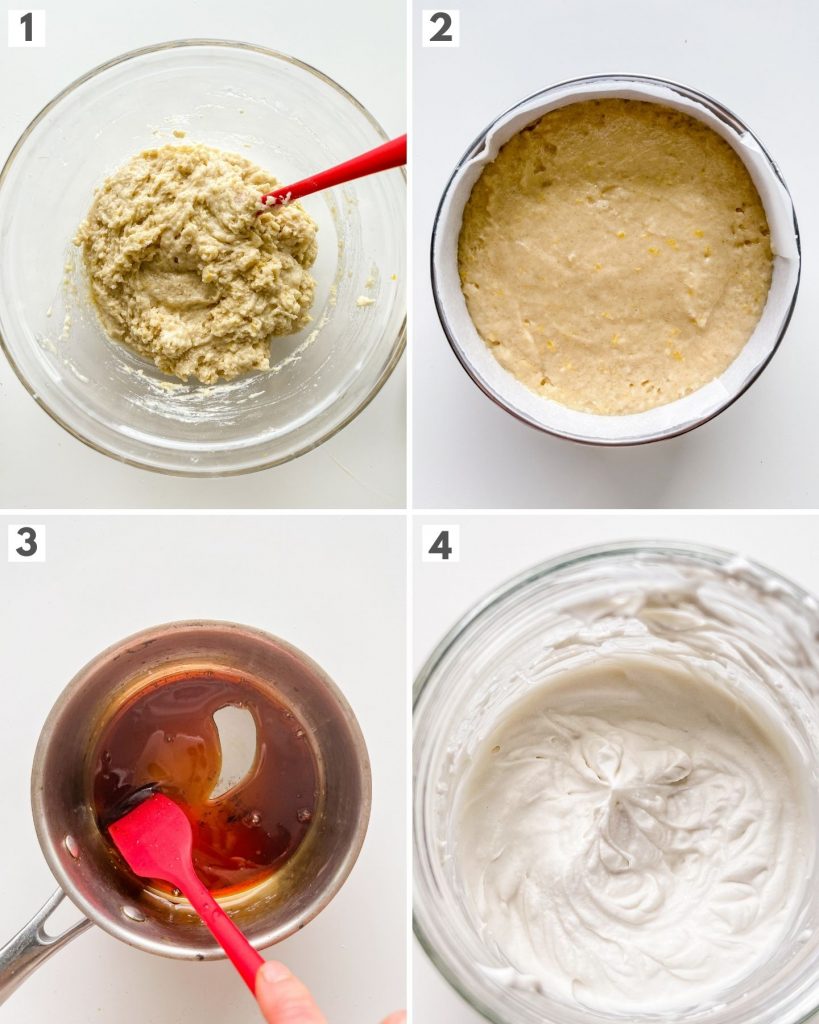
This cake is super easy peasy, lemon squeeeeeezy. Simply just mix the dry ingredients in one bowl, the wet in another and then combine the dry and wet until a thick batter forms. When mixing, use a spatula with folding motions to prevent over mixing, just until there are no streaks or lumps of flour left. Then pour it into a cake pan and bake!
After you remove it from the oven, be sure to transfer it to a wire rack as soon as you can handle it to prevent excess moisture buildup from the bottom (or it’ll cause a soggy-bottom-cake).
How to Make Burnt Sugar Syrup (+ tips!)
Burnt sugar syrup gives this cake an extra oomph of nutty flavour and adds this sticky-moisture like (in the best way) glaze on top. It’s VERY quick to make so keep your eyes on it!!
- Add sugar and water to a cold sauce pan, then turn heat on to medium.
- Let it sizzle and bubble, until sugar is dissolved. It will start to turn golden brown.
- Once the colour begins to deepen to a amber colour (think maple syrup), immediately turn off the heat and CAREFULLY (!!) add in the hot water. It will bubble vigorously and keep your face away from the saucepan. If you’re worried about burning, wear gloves and use a sauce pan cover as a shield when pouring in. The water MUST be hot or it will solidify the sugar.
- Stir the syrup and ensure all the sugar is dissolved. Depending on how much residual heat is left in the pan you may need more or less hot water to get a syrup-y consistency. It WILL thicken as it cools so keep it on the liquid-y side.
More spingy lemon recipes to try!
- Healthy Lemon Zucchini Muffins
- Simmered Sweet Potatoes with Lemons
- Blueberry Lemon Cake
- Strawberry Lemon Snacking Cake
- Vegan Lemon Cupcakes
- Lemon Blueberry Mug Cake
- Lemon Poppy Seed Muffins
SAVE IT FOR LATER! ↓
If you recreate this Sesame Oil Lemon Cake recipe let me know how you liked it by leaving a comment and rating below or by tagging me on Instagram @Okonomikitchen, I love seeing all of your tasty recreations!
Hungry for more? Be sure to subscribe to my newsletter and follow along on Instagram, Youtube and Pinterest for more deliciousness!

Sesame Oil Lemon Cake with Burnt Sugar Syrup
- Total Time: 60 minutes
- Yield: 6 servings 1x
Description
Sesame Oil Lemon Cake with Burnt Sugar Syrup and topped with vanilla whipped cream. Deep, rich & nutty flavours of the sesame oil paired with citrusy bright lemon, infused in the most moist and tender cake.
Ingredients
Sesame Oil Lemon Cake
- 1 cup (136 g) all purpose flour
- 1/2 tsp baking soda
- 3/4 tsp baking powder
- 1/2 cup (58 g) super fine almond flour
- 1/4 tsp salt
- 1/2 cup (115 ml) unsweetened soy milk, room temperature
- 2 tbsp (30 ml) sesame oil
- 1 tbsp (15 ml) neutral oil*
- 1/2 cup (105 g) cane sugar
- zest of 1 lemon
- 3 tbsp + 1 tsp (50 ml) lemon juice
- 2 tsp (10 ml) ginger juice, optional
Burnt Sugar Syrup
- 2 tbsp (25 g) cane sugar
- 1/2 (7 ml) tbsp water
- 2–3 tbsp (30 – 45 ml) hot water
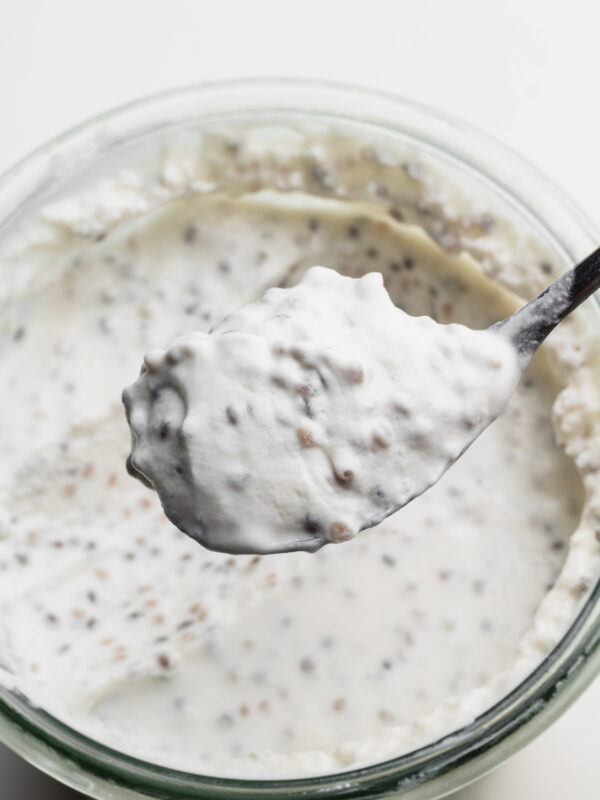
Dairy Free Whip Cream
- 1 tsp (5 ml) vanilla extract
- 1 cup (250 ml) soy heavy cream / whip cream or chilled coconut cream
- 3–4 tbsp (24 – 32 g) powdered sugar
Instructions
- Prepare: Pre-heat the oven to 350 F (180 C). Line a 6 inch cake pan.
- Cake batter: To a bowl, sift in the flour, baking powder and baking soda. Add the almond meal and salt, and whisk together. In another mixing bowl, whisk together the soy milk, sesame oil, neutral oil, cane sugar, lemon zest, lemon juice and ginger juice. Add the dry ingredients to the wet ingredients and use a spatula to mix, using folding motions until just combined and there are no more streaks of flour.
- Bake: Transfers the cake batter to the prepared cake pan. Carefully drop the cake pan 3-4 times to remove any air bubbles. Smooth out the top with a spatula. Bake for 45-50 minutes, or until a little past golden brown on top and springy to the touch. Remove from the oven, let it cool for 3 minutes in the pan and then transfer to a wire rack.*
- Burnt sugar syrup: Starting with a cold sauce pan, add the sugar. Turn on the heat to medium and add the water, and bring it to a boil and let it bubble. Once amber in colour, turn off the heat and carefully add in 2 tbsp of hot water (it will bubble vigorously). Swirl the pan and continue to let it bubble. If the glaze looks thick, add in remaining hot water 1 tsp at a time until it is thinned out. It will continue to thicken as it cools so you want to keep it on the liquid-y side. Pour into another bowl and set aside.
- Whip cream: Add the vanilla, soy heavy cream / coconut cream and powdered sugar to a chilled jar. Use a electric hand mixer and whip on medium speed for 2-3 minutes, until soft stiff peaks form. Place back into the fridge until ready to serve.
- Assemble: Once cake has cooled, brush the glaze over the surface of the cake. Slice into desired pieces and serve with whip cream. Serve and enjoy!!!
Notes
- *this cake tastes even better the next day, so I highly recommend making it the night before. Once the cake cools, wrap it and let it sit overnight.
- Helpful Equipment: mixing bowls, whisk, lemon juicer, pastry brush, 6 inch cake pan, spatula, electric hand mixer
- Nutritional Information Disclaimer: Nutrition information is a rough estimate calculated on an online tool (Cronometer).
- Prep Time: 15 minutes
- Cook Time: 45 minutes
- Category: dessert
- Method: baking
- Cuisine: vegan, japanese
Nutrition
- Serving Size: 1 serving
Okonomi Kitchen is a participant in the Amazon Services LLC Associates Program. When you purchase something through my amazon affiliate links, I earn a small commission that helps me produce consistent content at no cost to you. Thank you for supporting my plant based kitchen!


I made this as a loaf in an 8.5 x 4.5 pan (I don’t have a cute little 6 inch cake pan but now I want one!) and it worked great! I kept the temp same as the recipe and only needed ~5 extra minutes for the color to match.
I did the full sesame version and loved it but I’m going to try a combo next time!
I served mine with a vegan lemon curd I made in addition to a whipped cream topping 😋
@noshandfress
Sorry my spellingschecker ruined my message: i made this cake with glutenfree flour and it was great!
I made this cake euthanasie glutefree flour and it was gratis!
I finally made this after having this bookmarked for months! This cake had amazing texture, spongy texture, absolutely wonderful! I cut the sugar in half which made the cake a little less flavorful. If I were to do make this again, I think I would replace the sugar that I cut out with a little bit of monk fruit sweetener. I have a really pungent sesame oil from Taiwan so I decided to go in conservatively with 2T sesame oil and 1T avocado oil. Next time, full send with the sesame oil! The cake was lacking in lemon flavor since the lemons I had were really tame. Lesson learned, taste the batter and adjust accordingly. I think I would add a ton more lemon zest and maybe add toasted&ground sesame seeds for more sesame oomph. My cake turned out a bit lackluster flavor-wise but that was more my fault than the recipe’s since I didn’t taste and adjust. The texture of this cake seriously exceeded expectations. I can’t wait to make this again and do the recipe justice. Thank you for your innovative recipes!
This came out so good! I loved the texture, and it was really moist. I’m not a huge sweet or cake person, but this was just right for me. I didn’t have enough lemon juice, so the lemon flavor wasn’t very strong, but I didn’t mind it 🙂
If you love Italian olive oil cake this recipe is perfect! Yummy sesame flavor with a burnt sugar syrup and coconut cream. Even better the next day after it sat overnight!
Knew right away I had to make this esp with all the ingredients already in my pantry. This cake is moist, nutty, bright, and will def get the “not too sweet” approval of your Asian famirrry. Almond flour makes the cake a bit denser so next time, I’m going to try it again with a lemon curd layer!!
Bypass the neutral oil addition and just use only sesame oil. Sesame needs its moment to shine here! It is wonderfully fragrant and seems sesame strong but dont worry. the taste is quite balanced. I used 2x recipe for a 9in pan and it came out perfectly. Thank you for this amazing recipe, you deserve all the flowers for your original, free content 💐
Wow this is delicious! You are totally right that it tastes even better the next day. I can’t stop going to the fridge and cutting another slice 😆 I was under a time constraint, so I just added a layer of Miyoko’s cream cheese on top for frosting – complimented the cake amazingly!
It’s absolutely the most amazing recipe I’ve ever made! I don’t even know what i was expecting, it brought EVERYTHING! Perfect combination of flavors! Definitely a must try (and repeat!!)
Thank you Lisa for this incredible recipe!!
I found this recipe really easy and REALLY tasty. It was the hit of the party and I will def make it again!