
Learn how to make Japanese style or ‘Kewpie’ mayonnaise with this fool proof step by step recipe! This vegan kewpie mayo is rich and creamy with the perfect balance of sweet and tangy. The umami flavour is what makes this mayonnaise so delicious and popular! (Egg free & allergy friendly).

It’s FINALLY here: Homemade Vegan Japanese Mayonnaise (aka Kewpie Mayo)!
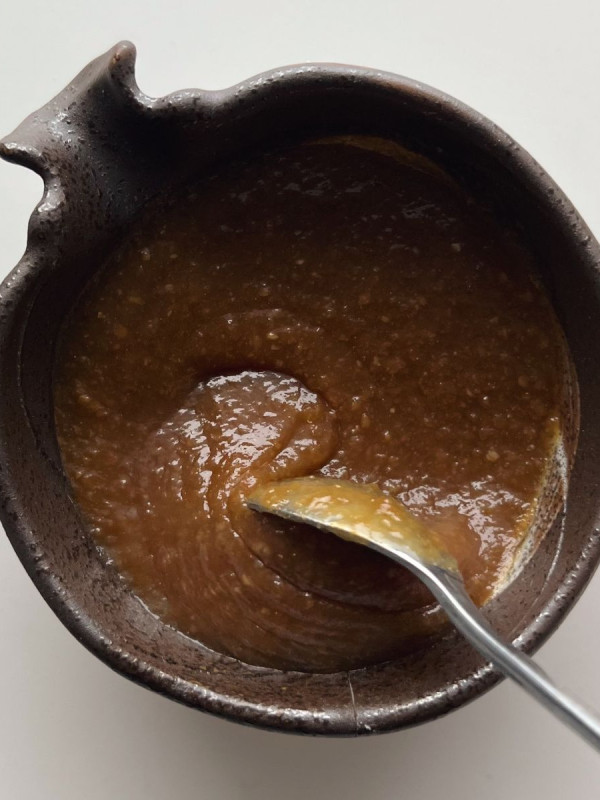
If you’ve been following along on my mayo-making journey over on instagram, you’ve probably seen how many times it has failed or not thickened up to my expectations. Growing up, we only ever used Japanese mayonnaise and it was one of my absolute favourite condiments to dip and drizzle on EVERYTHING… so I take my mayo very seriously. After going through almost 1 1/2 litres of oil… I finally came up with a recipe I can proudly say has the texture and tastes JUST LIKE store bought Japanese Mayo. It’s beautifully thick, rich, creamy and packed with the perfect amount of sweet, tangy and umami flavour. Not to gas myself up or anything… but it’s so good that my family stopped buying it and requested I make it for now on 😅.
What is Japanese Mayo?
Japanese Mayo, often referred to as Kewpie Mayo is just a type of mayonnaise seasoned differently. Kewpie mayo is just one brand of Japanese mayo but all mayo in Japan is sold in a clear tube with a finer tip making it easy to drizzle over dishes like okonomiyaki, takoyaki and various rice bowls. Kewpie mayo is defiantly a pantry staple in majority of Japanese households because of its versatility.
What does Japanese Mayo taste like?
Japanese mayo is sweeter, tangier and has umami to it thanks to the added MSG. It also has a slightly more egg-y taste to it because only whole yolks are used instead of a whole egg.
Difference Between Japanese Mayonnaise and Regular Mayonnaise
Japanese mayo is thicker, creamier and richer… yet has a light mouthfeel so it. It’s also slightly more yellow than regular mayo because it uses whole egg yolks only instead of a whole egg. Additionally, Japanese mayo is made with rice vinegar rather than distilled vinegar so the ‘tang’ is softer but more prominent.
Where to buy Vegan Japanese Mayo
Egg allergies have increased significantly in Japan so the demand for egg-free products have also become more popular. It is relatively easy to come across vegan egg free mayo in Japan but much more difficult here in North America. In fact, I haven’t been able to find it anywhere which is what inspired me recreate this vegan, egg free homemade Kewpie mayo.

Ingredients for Vegan Kewpie Mayonnaise
I’ve tested eggless mayonnaise with both soy milk and aquafaba and (IMO) aquafaba is much better if you want thick and creamy mayo. There are so many soy milk brands with all different percentages of soy that it is not as consistent.
Plus, it’s a great way to use up aquafaba which is often tossed anyways so why not use it to make some delicious mayo? 🙂 Another trick I picked up from Serious Eats is to use whole chickpeas which really helps thicken it up for those perfect mayo peaks. So, here’s what you’ll need:
- Aquafaba: Our egg replacer that helps emulsify the mayo
- Rice Vinegar: for a sweet tang
- Lemon juice: for flavour and tanginess
- Dijon Mustard: for flavour and helps with emulsification because of the lecithin
- Chickpeas: a key ingredient for thickening and emulsifying thanks to the lecithin
- Salt: for flavour
- Neutral Oil: I used canola oil but any neutral oil like safflower or grape seed oil.
- Sugar: for sweetness
- Kombu Dashi Granules: for flavour and umami.
- Adijonomoto: optional, but adds extra umami flavour. You can also substitute with more dashi granules.
- Black Salt: optional, but adds a slightly eggy flavour that Japanese mayonnaise tends to have
How to Make Japanese Kewpie Mayonnaise
The process of making eggless mayonnaise and relatively quick and easy. The ‘difficult’ part of making mayo is ensuring that the ingredients are emulsifying properly. As long as you follow the steps and tips below, you should achieve a delicious thick and creamy vegan mayo.
- Reduce aquafaba: This will give it a thicker consistency (like eggs). Add the aquafaba to a pot over medium high heat. Once it begins to bubble, reduce to medium low and simmer until thickened and reduced (about 5 minutes). Cool the aquafaba and then refrigerate. At this time, ensure other ingredients are also chilled (especially the oil).
- Blend first portion of ingredients: Add the aquafaba, rice vinegar, lemon juice, chickpeas, mustard and salt to a narrow jar. Stick the immersion blender to the bottom and blend until smooth.
- Add the oil: Once smooth, using the lowest blending speed pour the oil down along the immersion blender at a SLOW and steady speed. It should thicken quite quickly. Once you see it stop blending and the oil begins to build at the top, slowly move the immersion blender up and down to incorporate the remaining oil at the top.
- Season: Now add the remaining ingredients and blend everything together. Taste and adjust to your liking.
How to Store Homemade Mayonnaise
Transfer the mixture with a sterile spatula into a clean air tight container or squeeze bottle. Homemade mayonnaise will last about two weeks in the fridge.
Do not freeze mayonnaise as it will cause the emulsification to break.

Important Tips for Making Homemade Japanese Mayonnaise
After testing this recipe several times, I’ve picked up some key points and tips along the way to make perfect thick and creamy eggless mayo (so you don’t have to go through a litre of oil 😂😭):
- Do not scale the recipe: If you scale down, there isn’t enough for the blades the catch the ingredients and won’t allow for proper emulsification.
- Reduce aquafaba and cool in the fridge: It should be colder than room temperature because it will warm up with the blending and it’s easier to thicken with cold ingredients.
- Keep ingredients all the same temperature: This could work with room temperature ingredients but I found that using colder ingredients to be easier for the mayonnaise to thicken up.
- Skin the chickpeas: For smooth mayonnaise.
- Use an immersion blender: I’ve seen some recipes use a blender to make mayonnaise but personally have not been successful (it could be due to the fact the jar is wide and large). I highly recommend using an immersion blender because it’s also very hands on so you can control the motion.
- Use a narrow jar: Using too wide of a jar defeats the purpose of adding the oil slowly because the blades have a harder time catching the oil.
- Add ingredients in order: Make the ‘base’ mayonnaise first and then add the flavours at the end. You must blend the initial ingredients first before the oil.
- Pour oil in slowly so it drips down the actual hand blender into the blade: I found letting the oil run down the immersion blender better for emulsification because it goes directly down into the blades.
- Once it STOPS swirling, raise the hand blender: Once you can see it’s thick and the top is no longer swirling (there may be some oil on top and that’s okay) then slowly lift the immersion blender while still blending to incorporate the remaining oil.
Troubleshooting
If your mayonnaise is not emulsifying don’t quit! Keep the original mixture and place it into the fridge for 10-15 minutes or until cool again.
To a new narrow jar, add the aquafaba, rice vinegar, lemon juice, dijon, chickpeas and salt, and then blend it until smooth. Very slowly, pour the original mixture along the immersion blender and continue until it thickens.
Quick & Easy Kewpie Mayo
This ‘cheats’ or shortcut version of Kewpie Mayo using store bought regular mayo is what I’ve been using before coming up with this recipe. I definitely prefer the homemade version but this quick version is great in a pinch! All you need is:
- 1 cup vegan mayonnaise
- 1/4 tsp kombu dashi granules OR 1/8 tsp ajinomoto
- 1 1/2 tbsp rice vinegar
- 2 tsp sugar
Mix it all up, taste and adjust to your liking. Let it sit for 10-15 minutes and then serve!

What to Use & Serve Japanese Mayonnaise
Kewpie mayo is so versatile and can really be used for anything and everything! If something calls calls for mayo, swap it with this vegan kewpie mayo and you’ll know what I mean by it’s a flavour bomb. You can also mix it with other condiments like soy sauce, miso paste, sesame oil, sriacha and more for various dips and dressings. Here are some of my favourite dishes to use it in:
- Corn Mayo Udon
- Spicy Tomato Tuna
- Teriyaki Tofu Donburi
- Cheesy Kimchi Udon Noodles
- Vegan Japanese Fried Oysters
- Vegan Mentaiko Cream Udon
SAVE IT FOR LATER! ↓

If you recreate this Vegan Japanese Mayonnaise recipe let me know how you liked it by leaving a comment and rating below or by tagging me on Instagram @Okonomikitchen, I love seeing all of your tasty recreations!
Hungry for more? Be sure to subscribe to my newsletter and follow along on Instagram, Youtube and Pinterest for more deliciousness!

Japanese Mayonnaise (Kewpie Mayo)
- Total Time: 15 minutes
- Yield: 1 1/3 cups 1x
Description
Learn how to make Japanese style or ‘Kewpie’ mayonnaise with this fool proof step by step recipe! This vegan kewpie mayo is rich and creamy with the perfect balance of sweet and tangy. The umami flavour is what makes this mayonnaise so delicious and popular! (Egg free & allergy friendly).
Ingredients
- 3 tbsp reduced aquafaba (45ml)
- 4 tsp rice vinegar (20ml)
- 2 tsp lemon juice (10ml)
- 2 tsp dijon mustard (10g)
- 12 chickpeas, skinned (12g)
- 1 tsp salt (5g)
- 1 cup neutral oil (240ml)
- 2 tsp sugar (8g)
- 1/4 tsp shiitake or kombu dashi granules (1.5g)
- 1/8 tsp ajinomoto (1g), optional
- 1/4 tsp black salt (1g), optional
Instructions
- Reduce aquafaba: This will give it a thicker consistency (like eggs). Add the aquafaba to a pot over medium high heat. Once it begins to bubble, reduce to medium low and simmer until thickened and reduced (about 5 minutes). Cool the aquafaba and then refrigerate. At this time, ensure other ingredients are also chilled (especially the oil).
- Blend first portion of ingredients: Add the aquafaba, rice vinegar, lemon juice, chickpeas, mustard and salt to a narrow jar. Stick the immersion blender to the bottom and blend until smooth.
- Add the oil: Once smooth, using the lowest blending speed pour the oil down along the immersion blender at a SLOW and steady speed. It should thicken quite quickly. Once you see it stop blending and the oil begins to build at the top, slowly move the immersion blender up and down to incorporate the remaining oil at the top.
- Season: Now add the remaining ingredients and blend everything together. Taste and adjust to your liking.
Notes
- Helpful Equipment: immersion blender, squeeze bottle, air tight container
- Nutritional Information Disclaimer: Nutrition information is a rough estimate calculated on an online tool (Cronometer).
- Prep Time: 10 minutes
- Cook Time: 5 minutes
- Category: sauces
- Method: blending
- Cuisine: vegan, japanese
Nutrition
- Serving Size: 1 tbsp (14g)
- Calories: 71
- Sugar: 0.07g
- Sodium: 86mg
- Fat: 7.7g
- Saturated Fat: 0.5g
- Unsaturated Fat: 7.1
- Trans Fat: 0.03
- Carbohydrates: 0.62g
- Fiber: 0.04g
- Protein: 0.08g
- Cholesterol: 0
Okonomi Kitchen is a participant in the Amazon Services LLC Associates Program. When you purchase something through my amazon affiliate links, I earn a small commission that helps me produce consistent content at no cost to you. Thank you for supporting my plant based kitchen!


Hello! What type of salt (not the black salt) did you use for this recipe, so I’m not over-salting in initial step?
I used regular table salt 🙂
Hello, is there anything I can sub in for the msg? I am one of those people who has a bad reaction to it. I know it flavors the mayo tremendously. Please help, I REALLY want to make this! Thank you
Tastes absolutely amazing, however i couldn’t get it to emulsify completely, so i have the first batch cooling in the fridges troubleshoot advice later. do you think its because i ised rapeseed oil?
It may be because the oil wasn’t drizzled in slowly enough or ingredients were different temperatures.
Do you prefer this recipe or the one that uses tofu? I’m planning to make some for my friend who is vegan. I’m visiting her at the end of March 2022. Thanks
Yes 100%!
I swear I followed the instructions exactly, but it didn’t thicken up at all. Any ideas? Still tastes good at least.
Please check the troubleshoot section!
OMG!! I’ve never had the OG Kewpi mayo, so I was dying to try this recipe. It was so easy to make and it’s absolutely delicious! The next time I’d probably cut back on the black salt a little bit, just because the overall flavor is a little too salty for me – but my family has gone through two jars already so it looks like I’ll be making more.
AMAZING!! Kewpie mayo (especially spicy) was the one thing I was still eating after becoming vegan (99.9% haha) and finding a vegan version made my entire life!! Never thought I’d be able to find a vegan version that was pretty easy to make and actually tastes almost identical, but here we are! Definitely follow each step carefully to get a good consistency.
This taste JUST like Kewpie Mayo!!! Far superior to any vegan Mayo on the market, I will be making this instead of reaching for veganaise from now on.
I’ve never tried kewpie mayo before going mayo so I have no idea what to compare it to, but the mayo turned out well! I’ve been using it to make a spicy mayo sauce for vegan “fish” recipes. the troubleshooting tips were really helpful (as well as watching the reel lisa made) because it didn’t emulsify the first time. you may have to add more aquafaba like I did in the beginning to work. I realized the recipe meant for three tablespoons of the reduced aquafaba, not three tablespoons to begin with so I suggest starting off with double the amount on the stovetop if that makes sense! will definitely be making this again 🙂
Everything was working well until a added the last bit of oil, then it turned completely to liquid
Any tips?
Hi Alice! When adding in the last bit of oil, did you lift up the blender? Also be sure to do it slowly so it emulsifies properly!