This No Knead Focaccia recipe is the ultimate guide to bakery-style bread with just 5 ingredients and minimal hands-on time. Make it same-day or let it rise overnight for golden, fluffy focaccia with a crisp crust—easy enough for beginners yet impressive enough for any bread lover.
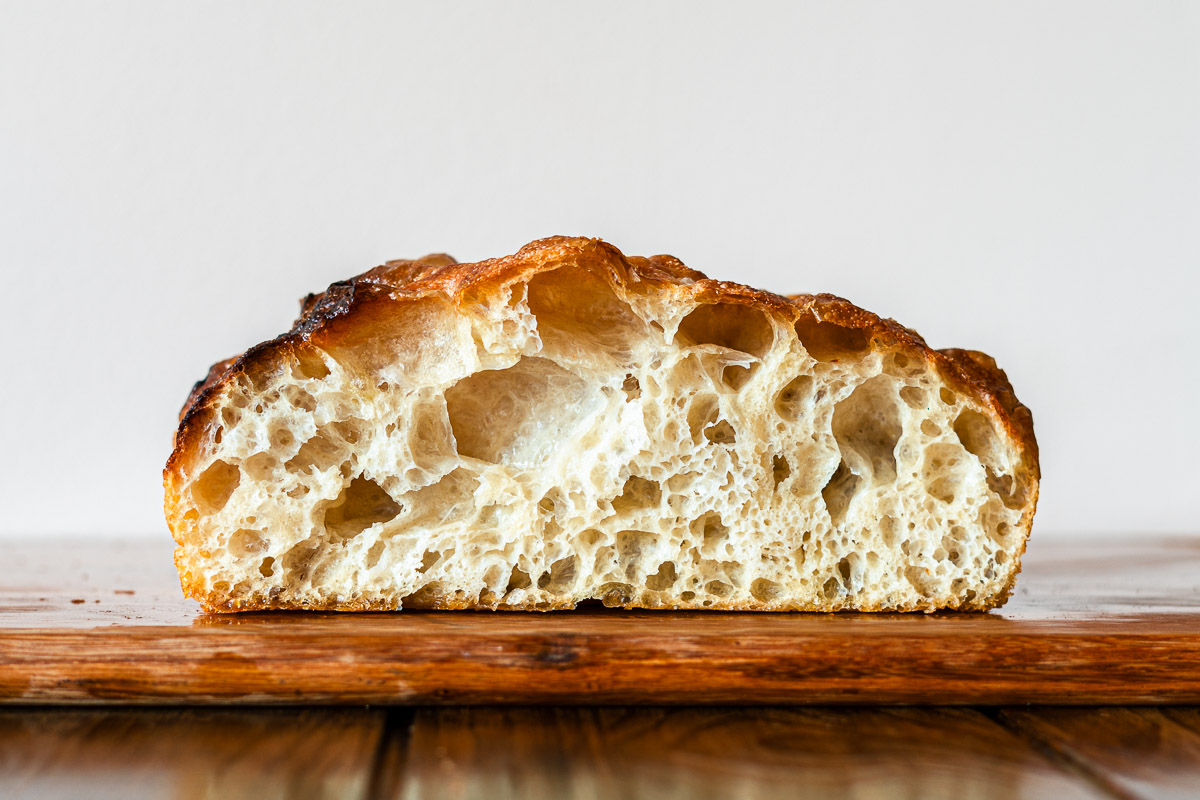
Table of Contents
- What is Focaccia?
- Why This Recipe
- 5 Key Ingredients
- How Hydration Impacts Focaccia
- Focaccia Needs How Much Oil?!
- How to Fold Focaccia Dough for Big Bubbles and an Airy Crumb
- The Purpose of Stretch and Folds
- What Are Coil Folds (and Why Bakers Love Them for Focaccia)
- Stretch and Folds vs. Coil Folds: Which Technique Is Best for Focaccia?
- Same-Day vs Overnight Method: Why Cold Fermentation?
- When and How to Dimple Focaccia (Double Dimpling)
- What Type of Pan to Use
- What Size of Pan to Use
- Focaccia Thickness Guide: How Tall Should Your Focaccia Be?
- How to Scale Focaccia Dough for Different Pan Sizes
- Scaling Ingredients Using Baker’s Percentages
- Step-by-Step: No-Knead Focaccia (3 Methods)
- 1. Stretch-and-Folds Cold Fermentation Method
- 2. Direct Cold Fermentation Method (No Stretch-and-Folds)
- 3. Same Day Method
- VIDEO: Watch How to Make It
- Comparing Different Methods: The Results
- Lisa’s Recipe Tips
- Serving Suggestions
- How to Incorporate Herbs and Other Ingredients into Your Focaccia Dough (Toppings)
- Dessert Focaccia Recipes
- Savory Focaccia Recipes
- How to Store and Reheat Leftovers
- Recipe FAQ
- No Knead Focaccia Recipe
I love focaccia. I started making it back in 2021, and ever since, it’s been my go-to bread. Not only is it delicious, but it’s probably one of the easiest breads you can make. It’s forgiving, practically impossible to fail, and freezer-friendly. You can make it ahead of time, and the flavor possibilities are truly endless—yes, even dessert! Use it for sandwiches, bloomin’ breads, garlic bread, French toast, toasts, croutons… anything you’d normally use bread for.
Over the years, I’ve shared plenty of focaccia recipes—from my very first miso garlic butter focaccia to dessert-inspired creations like cinnamon roll focaccia and riffs like bloomin’ cheesy garlic butter focaccia. Through all of these experiments, I’ve learned how small tweaks—like flour type, hydration, or choosing stretch-and-folds versus straight mixing—can completely transform the texture, flavor, and moistness of your bread.
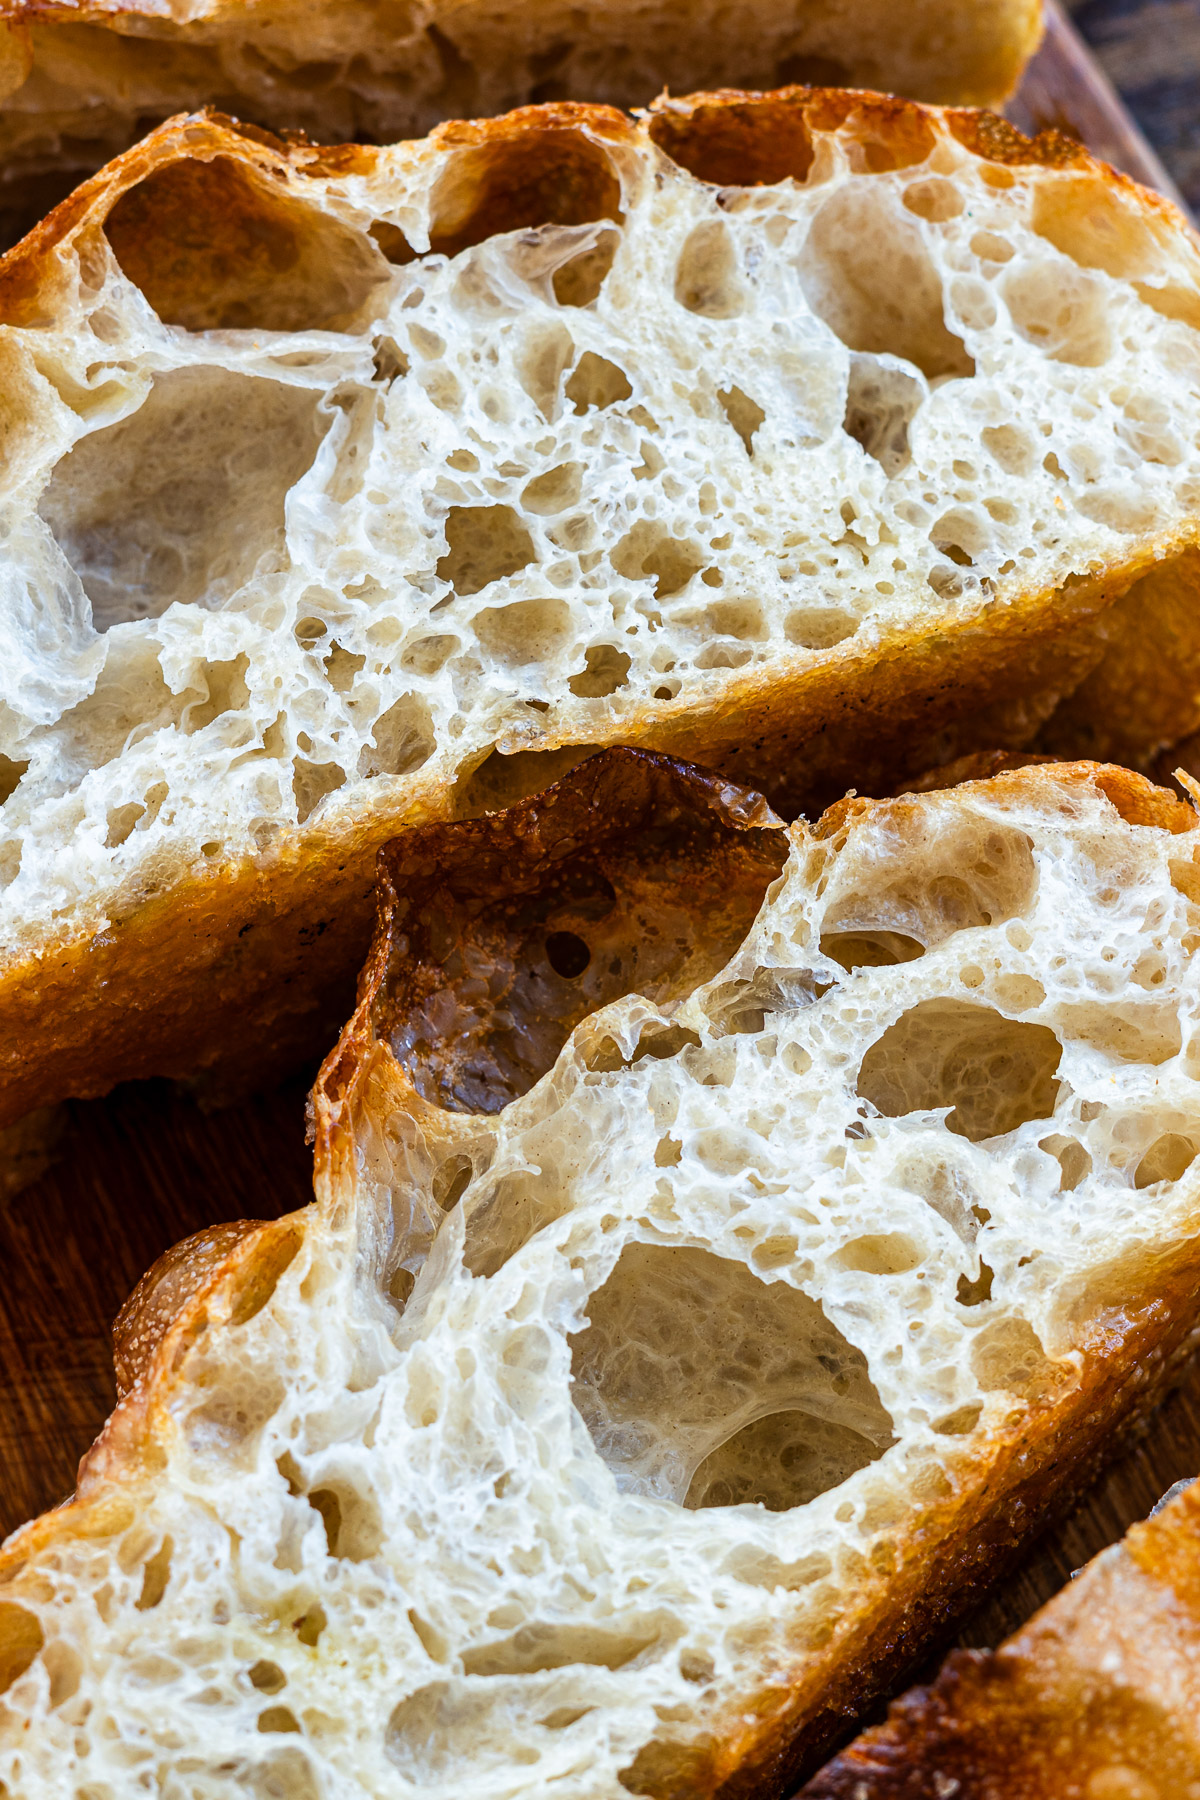
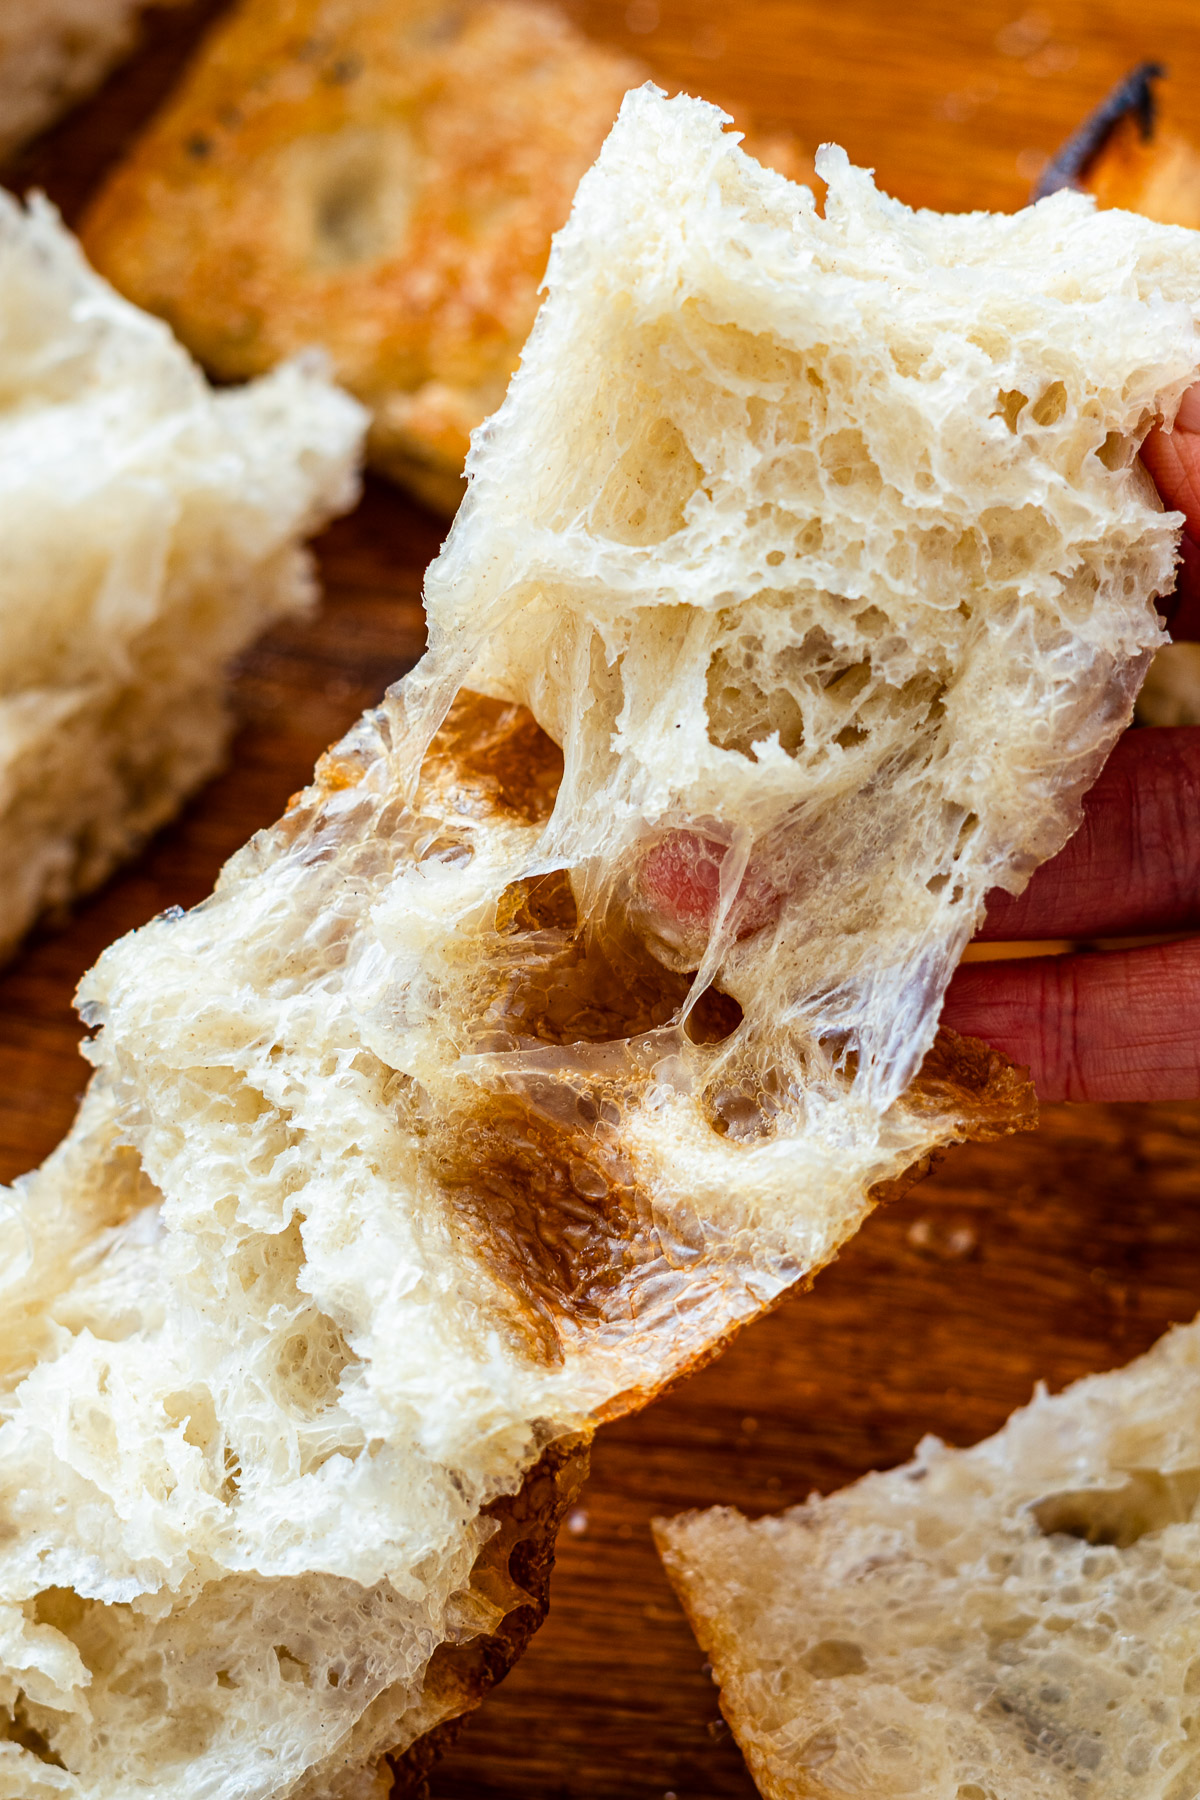
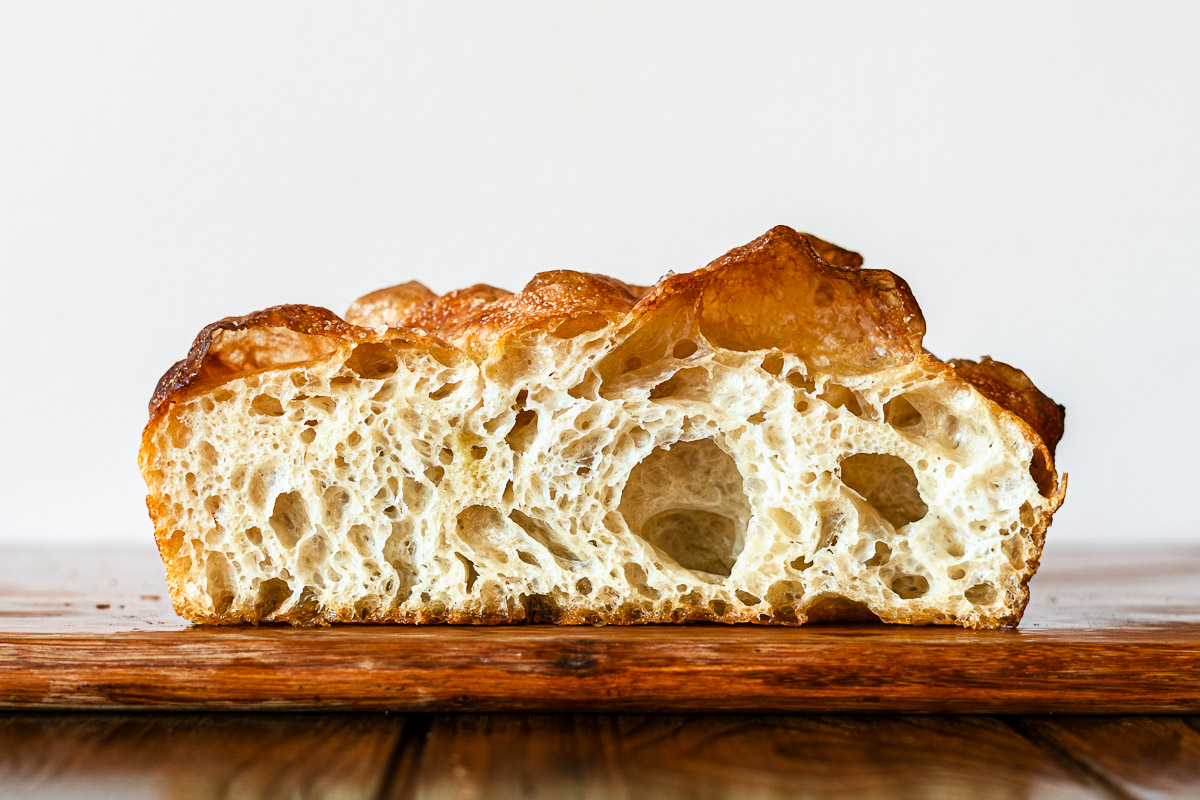
For me, the perfect focaccia checks a few boxes: it should be soft but spring back when pressed, and moist enough that it still looks “hydrated” (without ever being soggy). And the toasty factor? Non-negotiable. The entire exterior should be beautifully golden and crisp, with crackly edges that give way to a chewy, mochi-like, bubbly interior. The best part is, this focaccia stays crispy for hours, making it a lifesaver for parties, potlucks, or even just dinner prep ahead of time.
That’s why I decided to put everything I’ve learned about no-knead focaccia into one ultimate guide. This post has one comprehensive no-knead focaccia recipe, plus all the tips, tricks, and insights I wish I had when I started baking focaccia. Whether you’re after a classic, cheesy, or sweet focaccia, you’ll find everything you need here to bake focaccia as much as I do!
What is Focaccia?
Focaccia is a classic Italian flatbread known for its golden, dimpled crust and soft, airy interior. Traditionally baked in a pan with olive oil and topped with herbs, garlic, or coarse salt, focaccia is a savory bread enjoyed on its own, as a side, or in sandwiches. This versatile bread can be thick and fluffy or thin and crispy, making it a staple in Italian cuisine. Whether you’re a beginner or exploring no-knead focaccia techniques, understanding what focaccia is and how it’s made is key to baking this flavorful, savory bread at home.
Why This Recipe
- Incredible texture: The most important! So soft, moist, and chewy inside with a deep golden-brown, beautifully blistered crispy crust.
- Flavor & aroma: Rich, nutty, and slightly sweet from slow fermentation with the most incredible fresh-baked bread smell that fills your kitchen.
- No-knead & super easy: Less than 10 minutes of hands-on time.
- Flexible timing: Bake the same day or enjoy the benefits of a slow, 1-2 day cold fermentation.
- Unlimited variations: A versatile base for herbs, cheese, or even dessert-inspired focaccias.
- Freezer friendly: Makes ahead and enjoy anytime without compromising flavor or texture.
- Multi-purpose: Ideal for sandwiches, toast, garlic bread, or snack-sized bites.
5 Key Ingredients
Flour
Flour is the foundation of your focaccia, and the type you use makes a big difference in texture. Bread flour is higher in protein than all-purpose flour, which helps develop gluten, giving your focaccia that soft, chewy interior with structure to hold bubbles. To check, look at the protein content on the package—ideally, bread flour should have around 12–14% protein. In Canada, some all-purpose flours have protein levels similar to bread flour and can be used, though the texture will be slightly softer and less structured.
Yeast
Yeast is what gives focaccia its rise and flavor. Different types of yeast affect texture and flavor differently:
- Instant yeast: Fast-rising, mixes directly into flour, and gives a soft, airy crumb. Most common for no-knead focaccia.
- Active dry yeast: Can be mixed directly into flour or dissolved in water first; produces results similar to instant yeast, though rise times may vary slightly.
- Fresh yeast: Comes in a block; produces a slightly more complex flavor and softer crumb.
- Sourdough starter: Naturally fermented; adds a tangy flavor and chewy texture, slower fermentation.
- Fruit yeasts (like raisin yeast): Natural wild yeast; can produce interesting, subtle flavors but inconsistent results.
The amount of yeast used will vary depending on if you plan to bake it the same day, the next day or in 2 days. The longer fermentation time, the less yeast you need to use.
Salt
Salt is essential for flavor and also strengthens gluten. For focaccia dough, use fine sea salt or kosher salt mixed into the dough. For the topping, flaky salts like Maldon or fleur de sel add a beautiful crunch and bursts of flavor on the crust. The combination of salt in the dough and on top ensures a well-seasoned, savory focaccia every time.
Water
Water hydrates the flour, activates yeast, and helps gluten develop. The ideal temperature is around 100–105°F (38–41°C), but it will depend on your kitchen environment: use slightly lower water in a warm kitchen and slightly warmer water in a cooler kitchen.
Olive Oil
Olive oil enriches the dough, adds flavor, and helps create a golden crust. Quality matters: choose extra virgin olive oil (EVOO) over refined oil, preferably in dark glass containers to protect from light. Look for cold-pressed, mechanically extracted oils, ideally single-origin with varietal info. Check for authenticity markers like PDO, and consume within 2–3 months after opening. The best EVOO should taste fruity and grassy, with a slight back-of-throat burn from polyphenols. Store it away from heat and light to preserve flavor and nutrients.
How Hydration Impacts Focaccia
Hydration (aka the ratio of water to flour) plays a big role in how your focaccia turns out.
- Texture & Crumb: Higher hydration doughs (75–85%) bake up with that signature airy, hole-y crumb you see all over Instagram. If you keep it around 65–70%, the crumb will be a bit tighter and fluffier—perfect if you want to use it for sandwiches. Go much lower than that and the focaccia starts leaning more dense and bready.
- Crust: More water in the dough usually means a thinner, crispier crust thanks to the extra steam created during baking. Lower hydration = thicker, chewier crust.
- Handling: The wetter the dough, the stickier and looser it feels. High-hydration doughs can be a bit messy to work with but reward you with those dramatic bubbles. Moderate hydration is easier to handle and spread into the pan. Low hydration is firm and simple to shape but won’t give you that same airy look.
- Flavor: Higher hydration encourages more enzymatic activity during fermentation, which develops flavor over time—especially if you cold ferment.
I’ve played around with a lot of different hydration levels—from 70% all the way up to 95%. My personal sweet spot is around 85–90% hydration. Anything past 90% starts to feel almost too wet: the dough is tricky to handle and it doesn’t bubbly up quite the way I like. On the flip side, below 70% you’ll get a tighter, more uniform crumb. That’s not necessarily a bad thing—it just depends on the texture you’re going for.
Most no knead focaccia recipes land between 70–85% hydration. If you’re chasing big, lacy holes, aim closer to 85-90%. If you prefer a fluffier bread for slicing, stay around 70%.
Focaccia Needs How Much Oil?!
If you’ve ever watched focaccia videos online, you’ve probably seen the comments section go wild about the amount of oil being poured in. Here’s the thing: I give rough amounts in my recipes, but honestly? I almost never measure—and I don’t think most avid focaccia bakers do either. Olive oil isn’t just for flavour (though it adds that rich, fruity depth we love), it’s also key for texture. It keeps the dough from sticking to your hands, helps release it from the pan, and gives the crust that crisp, golden edge. So yes, be generous! Over time, you’ll get a feel for how much your dough needs. Consider the measurements more of a guideline and adjust as you bake—your focaccia will tell you what it needs.
How to Fold Focaccia Dough for Big Bubbles and an Airy Crumb
Folding might seem like a small step in the process, but it’s one of the biggest factors in how your focaccia turns out. The way you handle the dough during bulk fermentation affects the strength, structure, and ultimately the size of the bubbles in the final bake. Here’s how I approach it:
The Purpose of Stretch and Folds
Stretch and folds are one of the easiest ways to build gluten strength without heavy kneading. By lifting the dough from the edge and folding it over itself, you’re gently aligning the gluten strands. This not only strengthens the structure but also helps trap and redistribute gas produced during fermentation. Strong gluten is what gives focaccia enough support to rise tall while still staying airy.
In my process, I add a little twist during the first set: a few slap-and-folds right in the bowl. I’ll lift the dough, slap it down, and fold it over itself a few times until it feels taut. It only takes a few seconds, but I like how much tension it creates compared to a standard stretch and fold. It’s not something I see often, but it gives the dough a quick strength boost before I move into gentler folds.
What Are Coil Folds (and Why Bakers Love Them for Focaccia)
Coil folds are another method of strengthening dough, but they’re especially helpful for higher-hydration recipes like focaccia. Instead of stretching from the edge, you lift the dough from the center, tuck the ends underneath, and let it coil back into place. This motion tightens the dough while keeping air inside, which is key for that open, bubbly crumb.
Because coil folds are so gentle, they’re usually best once the dough has already started building strength. By that stage, fermentation is creating lots of little air pockets, and coil folds help support the dough without deflating it. They also make sticky, high-hydration dough easier to handle compared to traditional folds.
Stretch and Folds vs. Coil Folds: Which Technique Is Best for Focaccia?
Both methods work toward the same goal: developing gluten strength and organizing the dough’s structure. The main difference is when and how you use them. Stretch and folds are great at the beginning of bulk fermentation because they quickly add elasticity. Once the dough has gained some strength, coil folds shine because they maintain structure while protecting the bubbles forming inside.
For my focaccia, I like to use a combination of both: 1–2 rounds of stretch and folds (with a few slap-and-folds during the first set), followed by 2–3 coil folds spaced about 20–30 minutes apart. This approach gives me the best of both worlds: strong enough gluten to hold its shape, but a gentle touch later on to preserve air. The result? A tall, airy focaccia with those signature big holes.
Same-Day vs Overnight Method: Why Cold Fermentation?
If you’ve ever wondered why some focaccia just tastes better and has those irresistible big bubbles, the secret is in cold fermentation. While a same-day rise gets your dough ready fast, letting your focaccia dough chill overnight or even days in the fridge develops richer flavor and a superior texture.
Cold fermentation slows the yeast, allowing enzymes to break down starches into natural sugars, deepening the bread’s flavor. It also fully hydrates the gluten, strengthening the dough and creating a light, airy crumb. Shaping the focaccia after this slow, cold rise gives you those perfectly structured bubbles and a tender interior.
I’ve tested focaccia with 12 hours, 24 hours, 48 hours and 72 hours. By far, my favourite both texture and flavour wise was letting it cold ferment for 48 hours. Note that the amount of yeast used will also play a role in flavour. The more yeast used for a shorter period of time, the more “yeasty” the flavour, whereas using less yeast for a longer period lets the enzymes and natural wheat flavours shine.
In short: long cold-fermented focaccia = tastier, more textured, and beautifully airy bread.
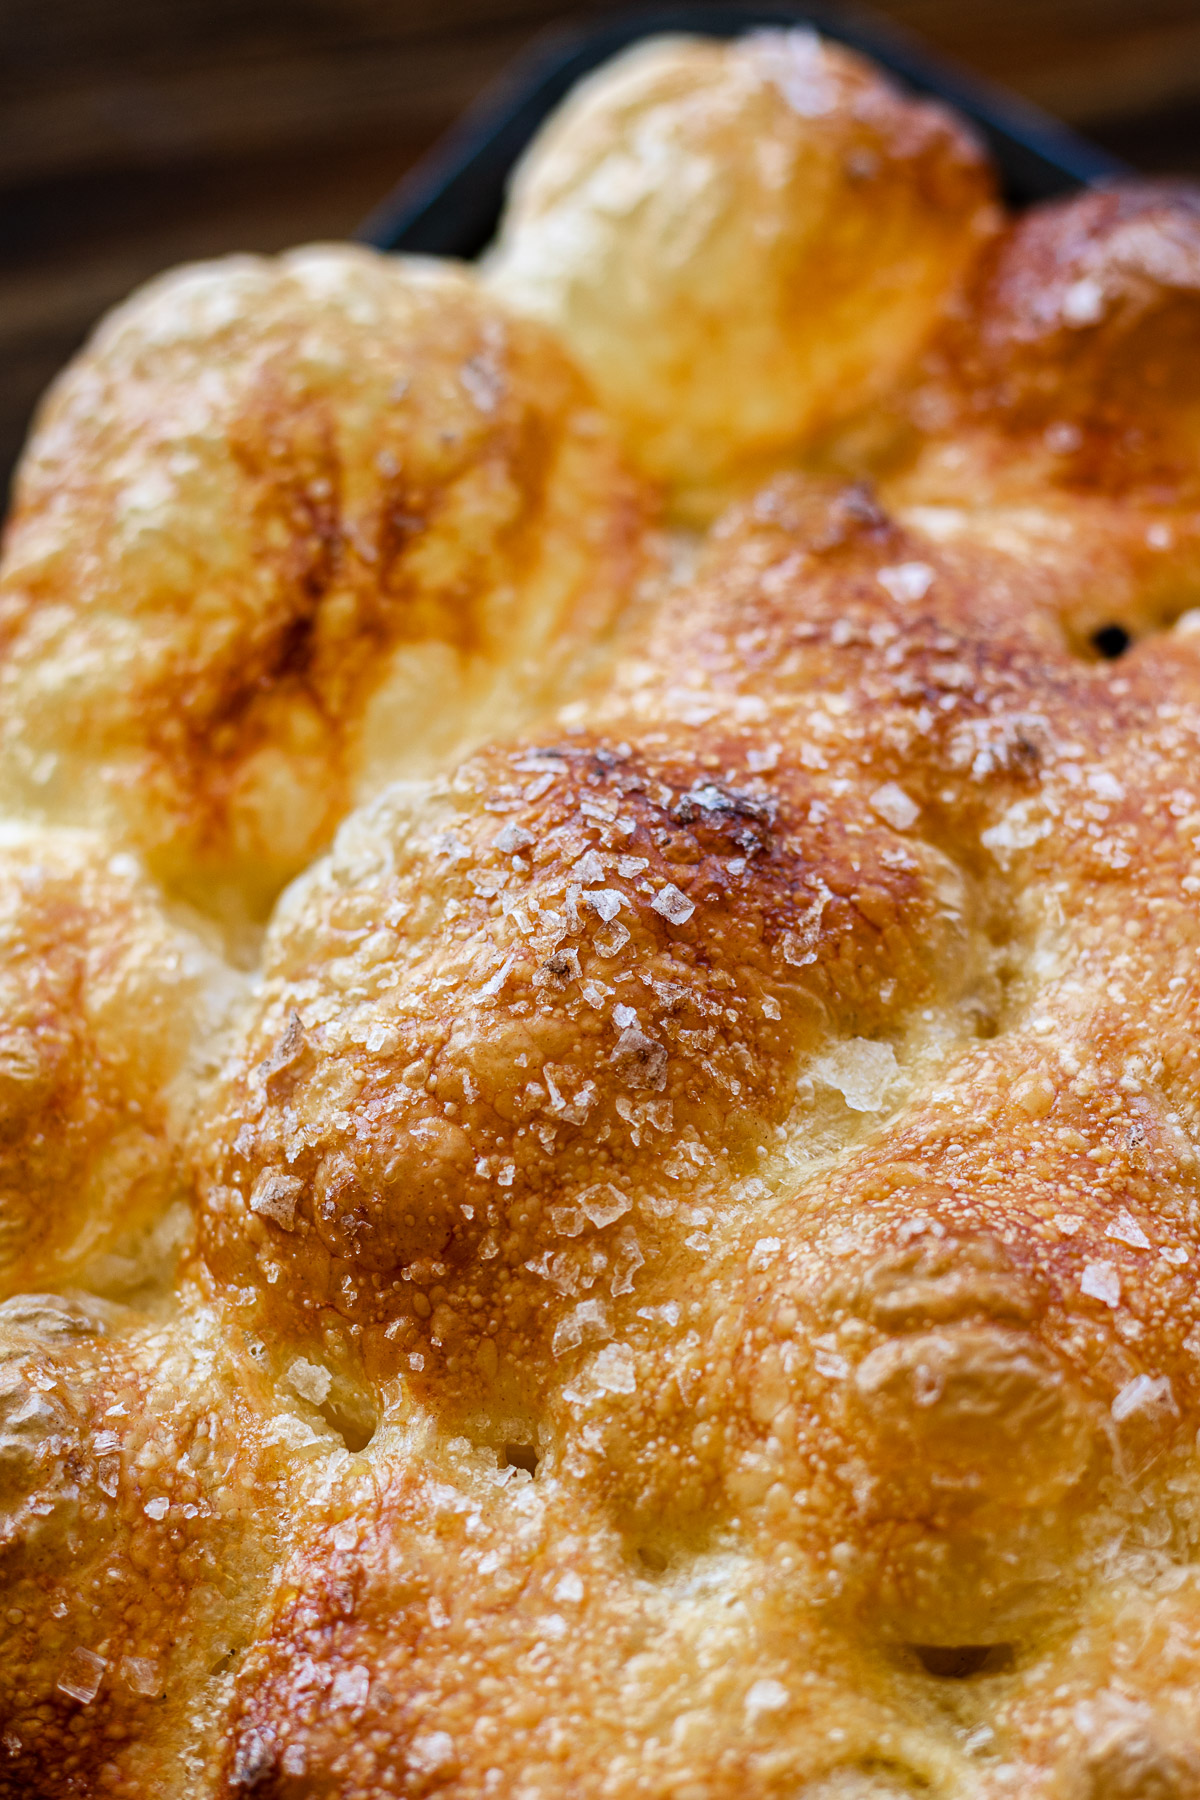
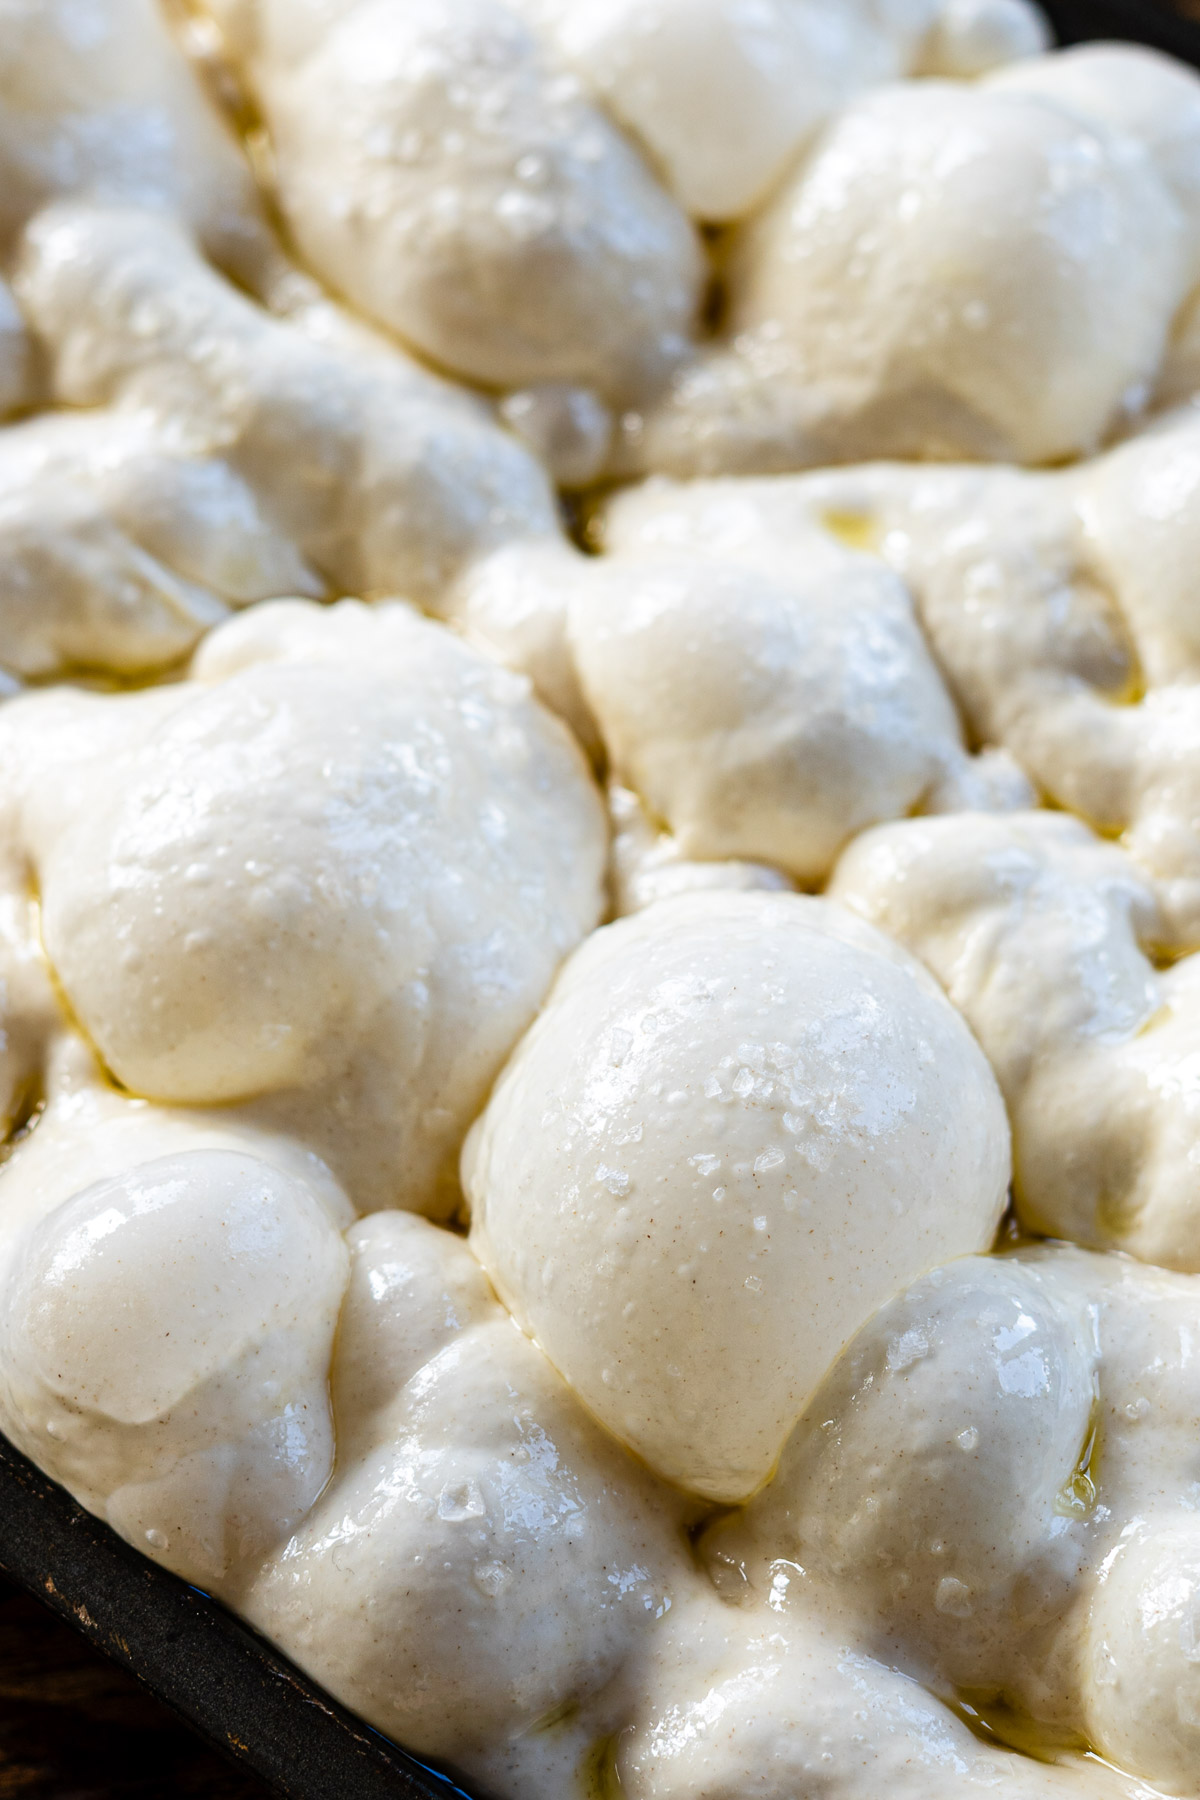
When and How to Dimple Focaccia (Double Dimpling)
The dimples in focaccia aren’t just for looks—they help olive oil and toppings stay put, keep the dough from puffing unevenly, and create those delicious little flavor pockets.
To do it, lightly oil your hands and use the pads of your fingers (not the tips!) to gently press into the dough while wiggling your fingers a little, which redistributes the gases inside and makes air bubbles pop up elsewhere—it’s oddly satisfying to watch.
One time I forgot to preheat the oven and the dough ended up resting about 20 minutes after dimpling and dimpled them again before baking… and the bubbles were some of the biggest and airiest I’ve ever had. Why though?
- Redistributes the gas: The first round of dimpling gently evens out the dough without knocking out all the air. During the short rest that follows, the yeast gets back to work and reinflates those pockets, often making them even bigger.
- Helps gluten relax: After the first press, the dough tightens a little. Giving it time to rest lets the gluten relax again, so the second dimple goes deeper and creates more space for bubbles to form.
- Supports oven spring: Splitting the dimpling into two stages means you’re not deflating the dough all at once. Instead, you’re controlling the gas so the bread rises evenly in the oven while still keeping those dramatic air pockets.
- Soaks in the olive oil: The extra rest also gives the dough time to absorb some of the oil, which makes the crust crispier and the crumb more tender.
So if you’re chasing that extra airy crumb, try double dimpling!
What Type of Pan to Use
The material of your pan affects how evenly and quickly your focaccia bakes. Highly conductive metals like aluminum or an aluminum-steel combination transfer heat efficiently, giving your focaccia a golden, crisp crust and a tender, airy interior. Stainless steel alone heats more slowly, while glass, ceramic, and stoneware are even slower and less effective at holding heat. Cast iron works too, but it takes longer to reach optimal temperature.
Pan color also plays a role: darker pans absorb heat faster than light-colored or shiny surfaces. That means a dark aluminum pan will brown your focaccia more quickly than a glass or light ceramic pan, producing a crispier bottom without drying out the interior.
Here’s what I’ve found works best:
- Black aluminum – Elite! Crisp, golden bottom crust with a moist, chewy interior.
- Steel-aluminum – Slightly less crisp than black aluminum, but still excellent.
- Clear tempered glass – Light gold crust and soft bottom; ideal if you prefer a cake-like focaccia, maybe for dessert focaccia!
- Shiny disposable foil – Poor results; deflected heat led to underbaking and a gummy crumb.
The takeaway: If you want a focaccia with a deep-golden, crunchy bottom and a pillowy, airy interior, stick to a dark metal pan—preferably black or dark gray aluminum. It’s a small choice that makes a huge difference in texture and flavor.
What Size of Pan to Use
For the best results, pick a pan that’s wide and deep enough to let your dough spread comfortably. Ideally, a depth of around 2 inches works perfectly for high-hydration doughs, allowing the bubbles to fully develop without overflowing.
Once you’ve picked your pan, the next question is: how much dough should you use to get your desired focaccia height? The answer depends on the thickness you’re aiming for, and I’ve got a simple guide for that.
Focaccia Thickness Guide: How Tall Should Your Focaccia Be?
The height of focaccia can vary depending on hydration, how many bubbles form (open vs. tight crumb), toppings, whether it’s stuffed, and the total dough relative to your pan size. Depending on what I’m adding, what I’m baking it for, and the pan I’m using, I’ll adjust the dough accordingly.
Here’s the guide I use to calculate dough amounts based on the thickness I’m aiming for:
- 4–5 g / sq in = 1/2-1 inch (1.27-2.5 cm) – Similar to Schiacciata. Great for sandwiches with thinner slices, like focaccia slab sandwiches.
- 6–7 g / sq in = 1.5-1.75 inch (3.8-4.5 cm) – Classic focaccia height. Perfect for stuffed focaccia, snacking, light sandwiches, or simple herb focaccia. Has a well balanced interior to crispy crust ratio. Many of my other focaccia recipes fall into this range.
- 8–9 g / sq in = 2-2.25 inch (2-2.25 cm) – Also a classic range. Again, ideal for stuffed focaccia, snacking, and slightly taller sandwich slices. I personally love this range! The recipe below is about 2 inches.
- 10–11 g / sq in = 2.5-2.75 inch (6.4-7 cm) – Thick and pillowy. Great for hearty snacking, pull apart focaccia, heavy toppings, French toast focaccia, or serving sliced down the middle.
How to Scale Focaccia Dough for Different Pan Sizes
Once you know the thickness you want, adjusting for pan size is simple:
- Calculate your pan area: length × width in inches.
- Decide your target dough per square inch based on the table above.
- Multiply pan area × dough per sq in to get the total dough weight.
Example:
I want a 1.5-inch focaccia in a 9×9-inch pan:
- Pan area = 9 × 9 = 81 sq in
- Target dough = 6 g/sq in
- Total dough = 81 × 6 = 486 g
Scaling Ingredients Using Baker’s Percentages
Once you know total dough weight, you can scale your ingredients using baker’s percentages. My basic focaccia percentages:
- 100% bread flour
- 87% water
- 3% salt
- 0.5% yeast
- Calculate flour weight:
- Flour weight= total dough/(1+0.87+0.03+0.005)=486÷1.905≈255g
- Calculate remaining ingredients
- Water = 255 × 0.87 ≈ 222 g
- Salt = 255 × 0.03 ≈ 7.5 g
- Yeast = 255 × 0.005 ≈ 1.3 g
- Confirm: 255 + 222 + 7.5 + 1.3 ≈ 486 g
This gives you the perfect dough for your pan and target thickness every time!
Step-by-Step: No-Knead Focaccia (3 Methods)
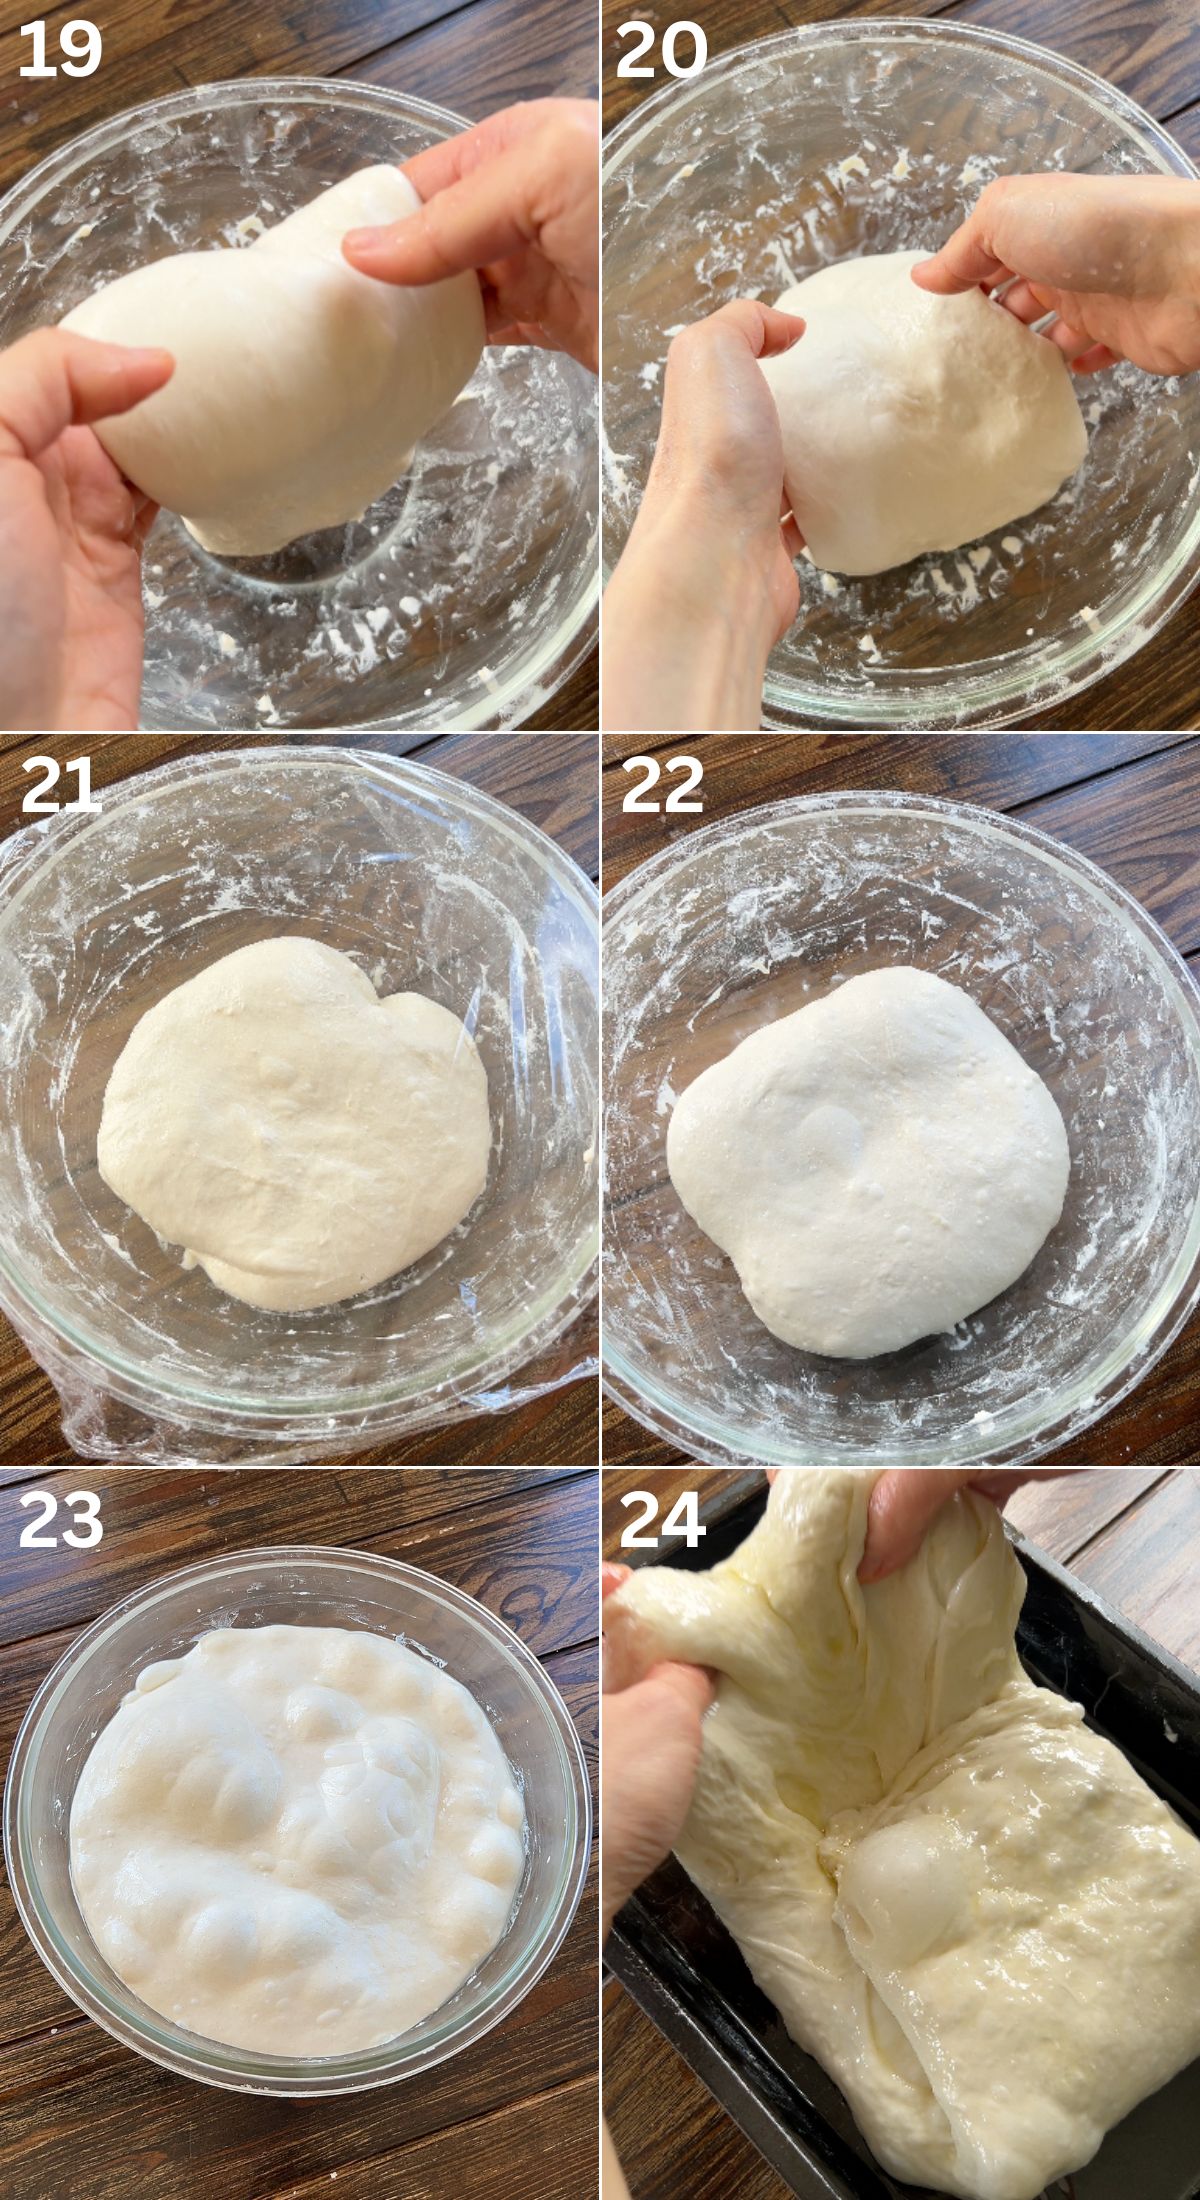
1. Stretch-and-Folds Cold Fermentation Method
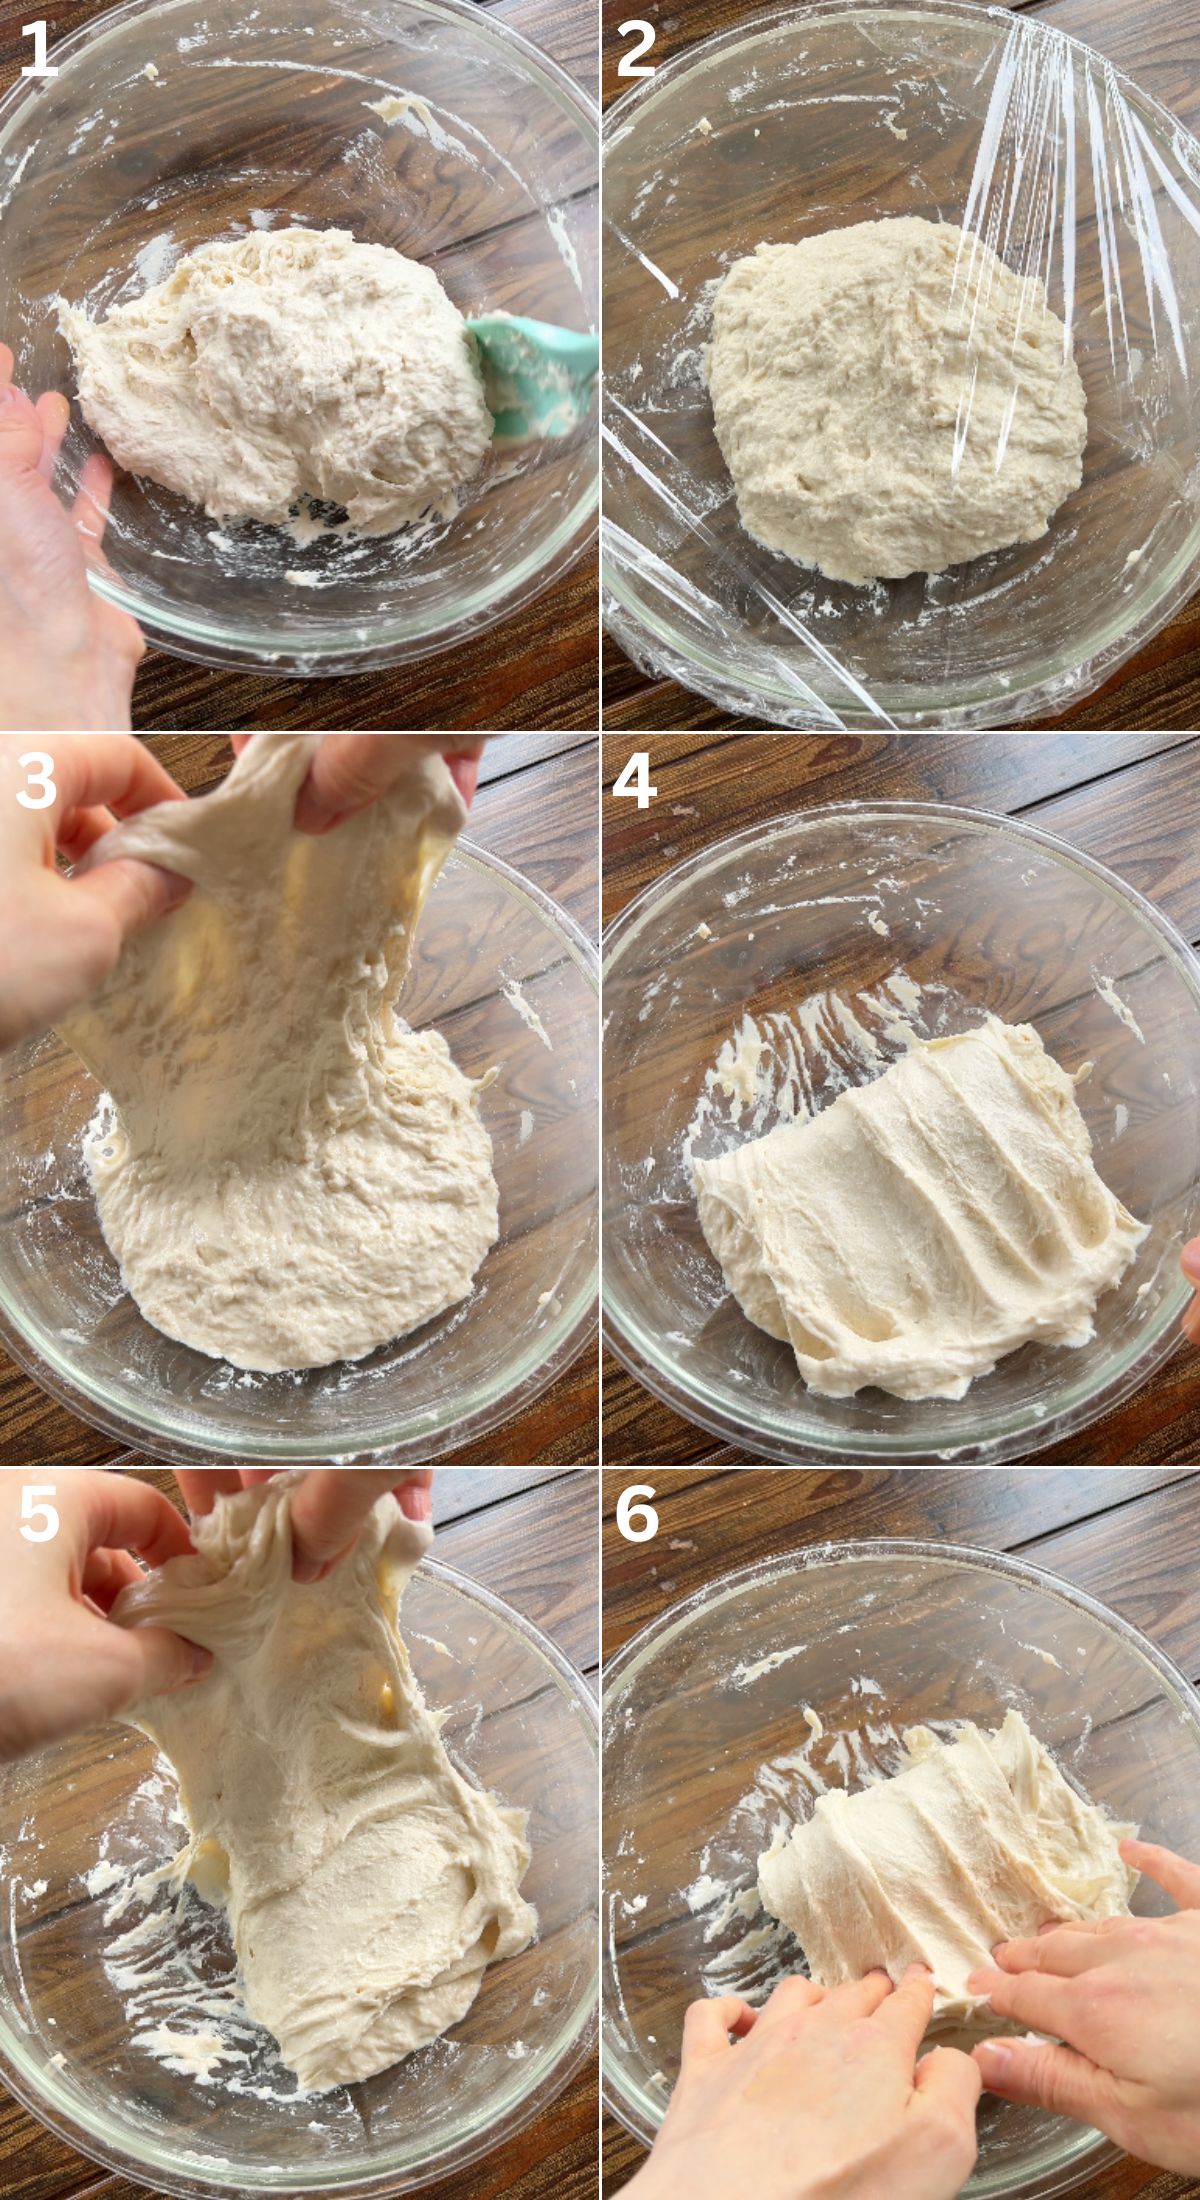
- Mix the flour, salt, yeast, and water until a shaggy dough forms. Cover and rest for 30 minutes.
- Perform one set of stretch-and-folds, going around the bowl at least once. Then do a few slap and folds. Cover and rest another 20-30 minutes.
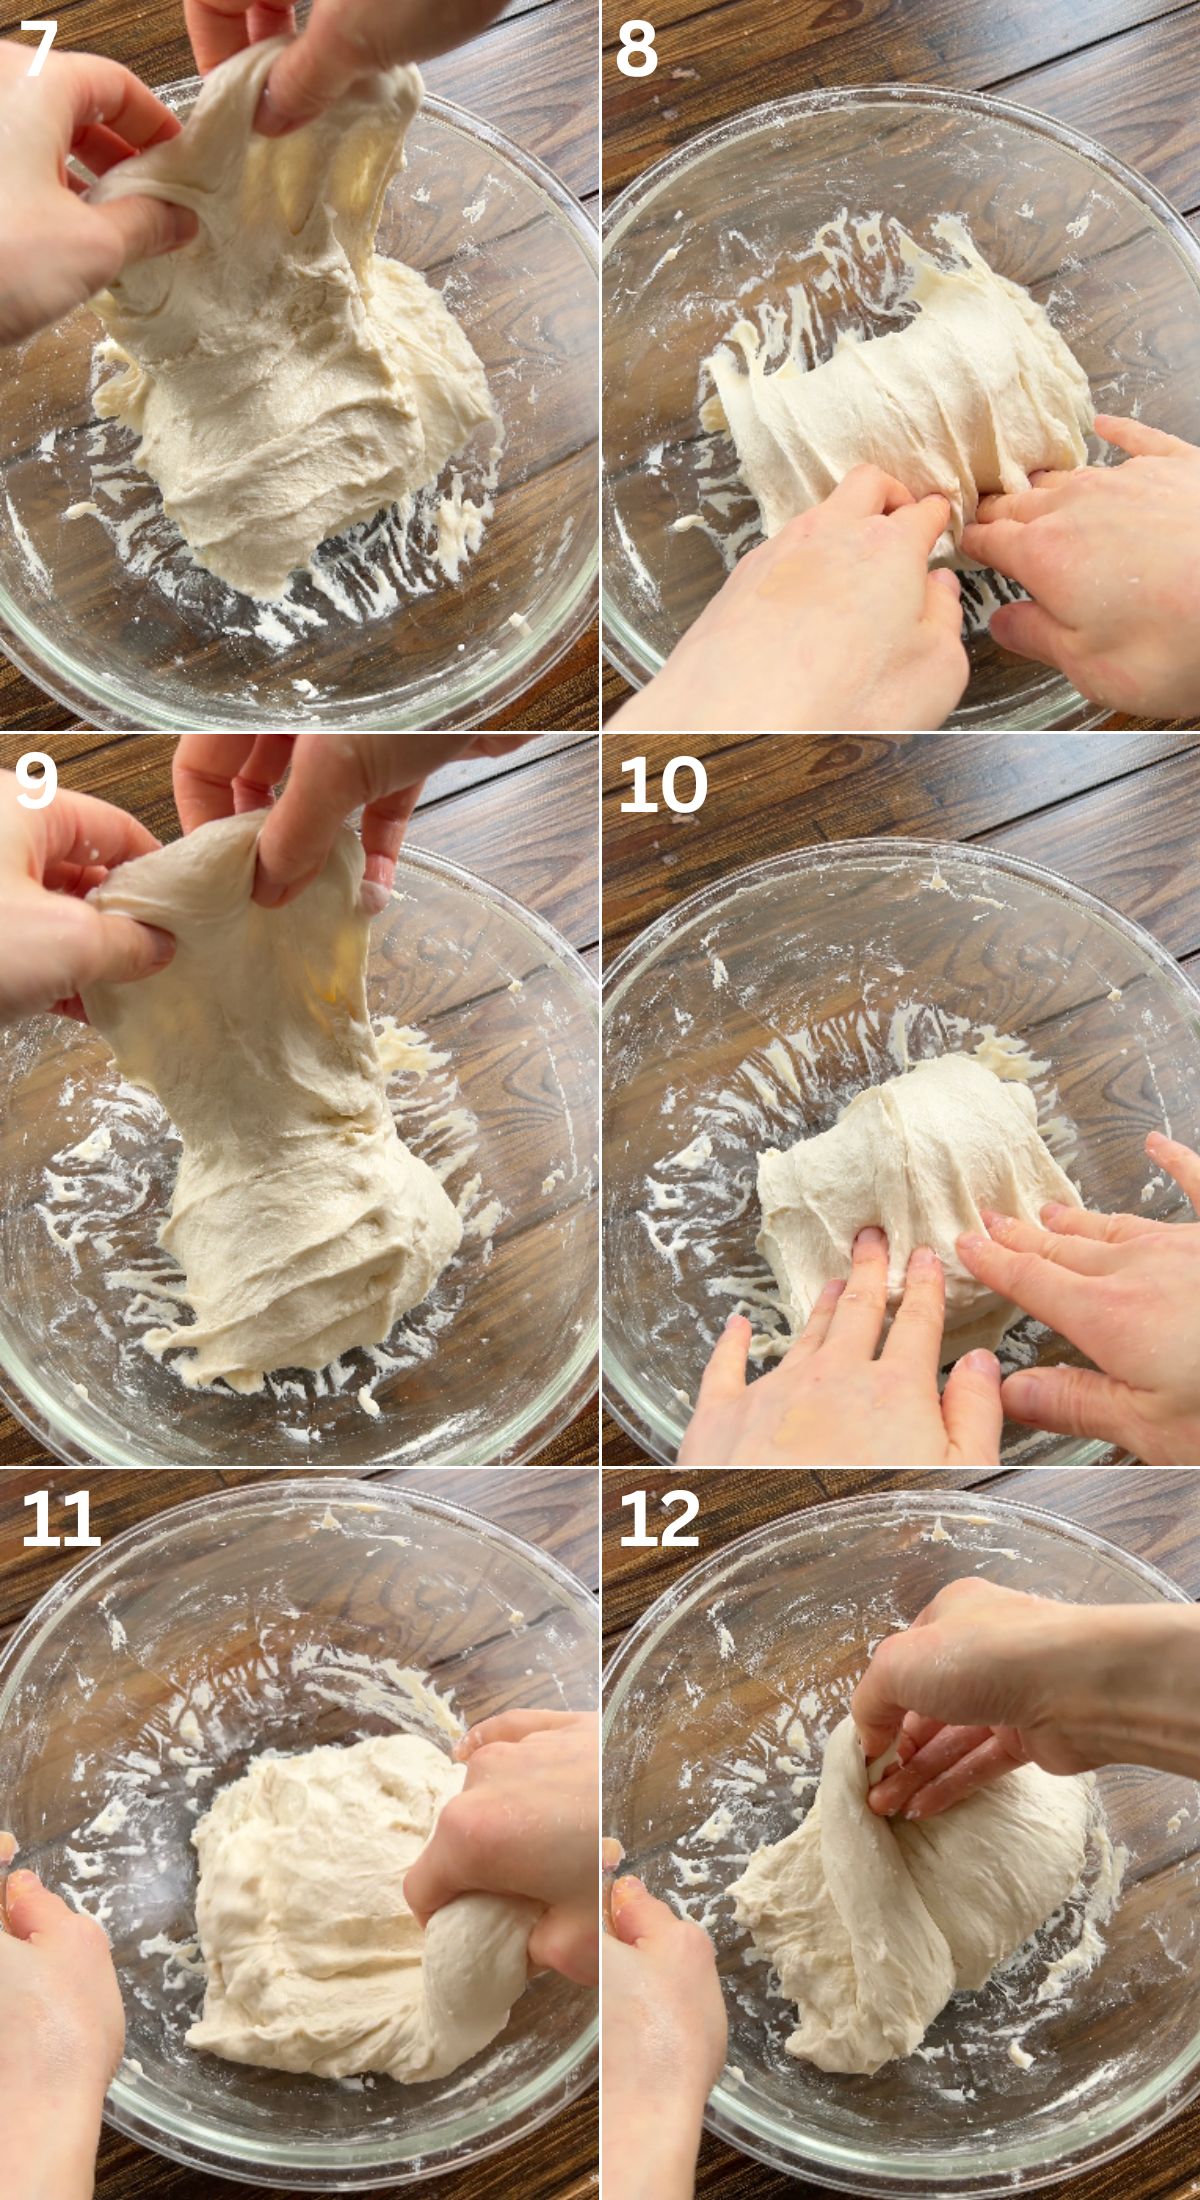
- For the second set, if the dough feels like it could use some more strength (ie. the dough tears when lifting), do another set or stretch-and-folds. If it feels smooth and stretches easily, perform a set of coil folds. Rest for another 20-30 minutes.
- Do a set of coil folds. To do so, lift the middle of the dough so the top edge comes off the bowl, and tuck it underneath. Rotate the bowl so the opposite side is on top, and repeat this motion on all sides. Rest for another 20-30 minutes.
- Do one more set of coil folds.
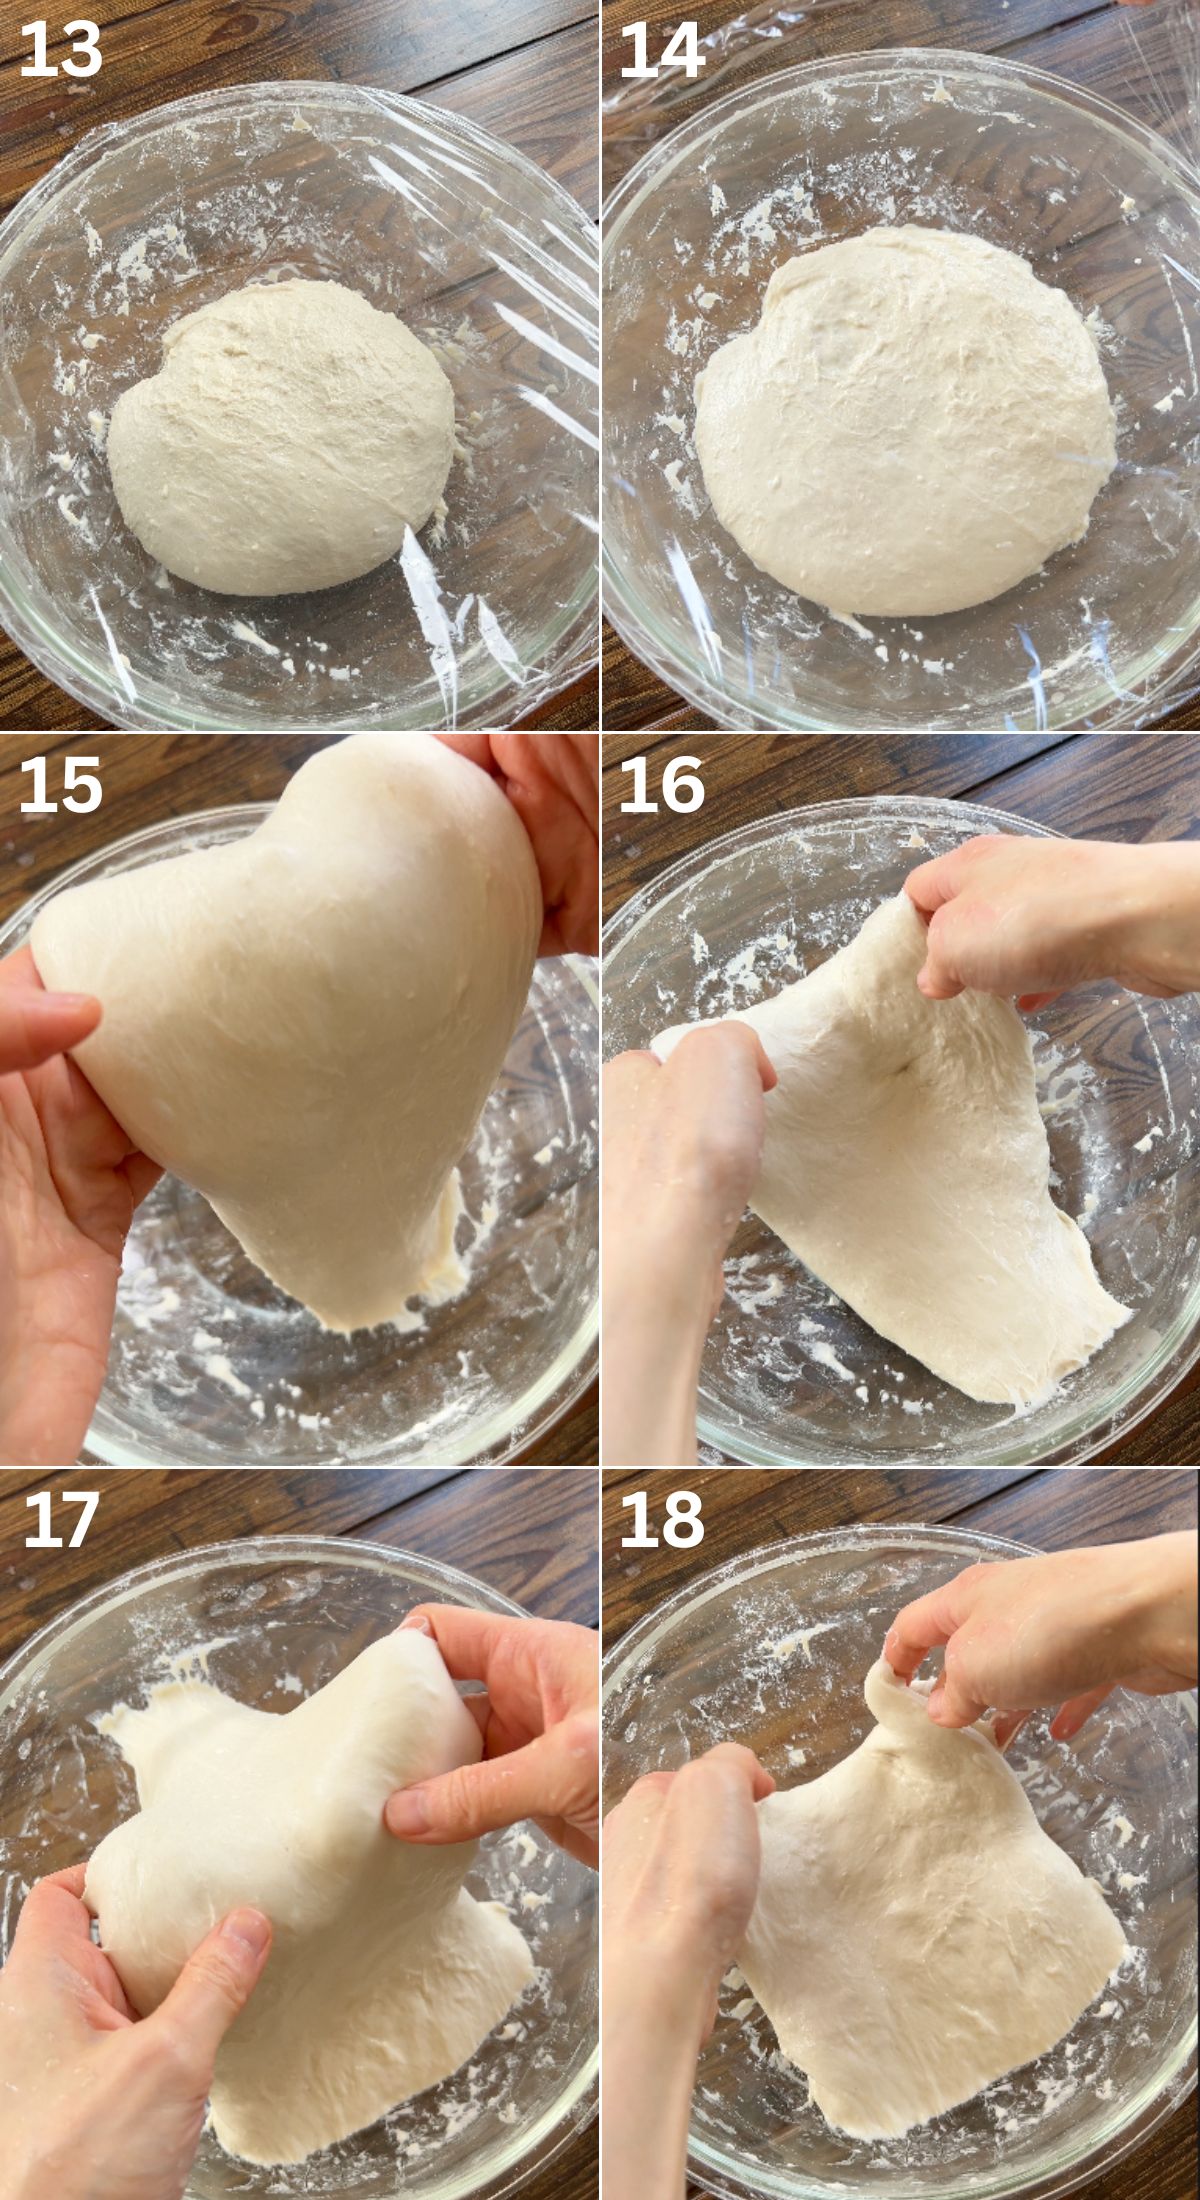
- Cover and refrigerate the dough overnight for at least 12 hours, preferably 48 hours and up to 72 hours.
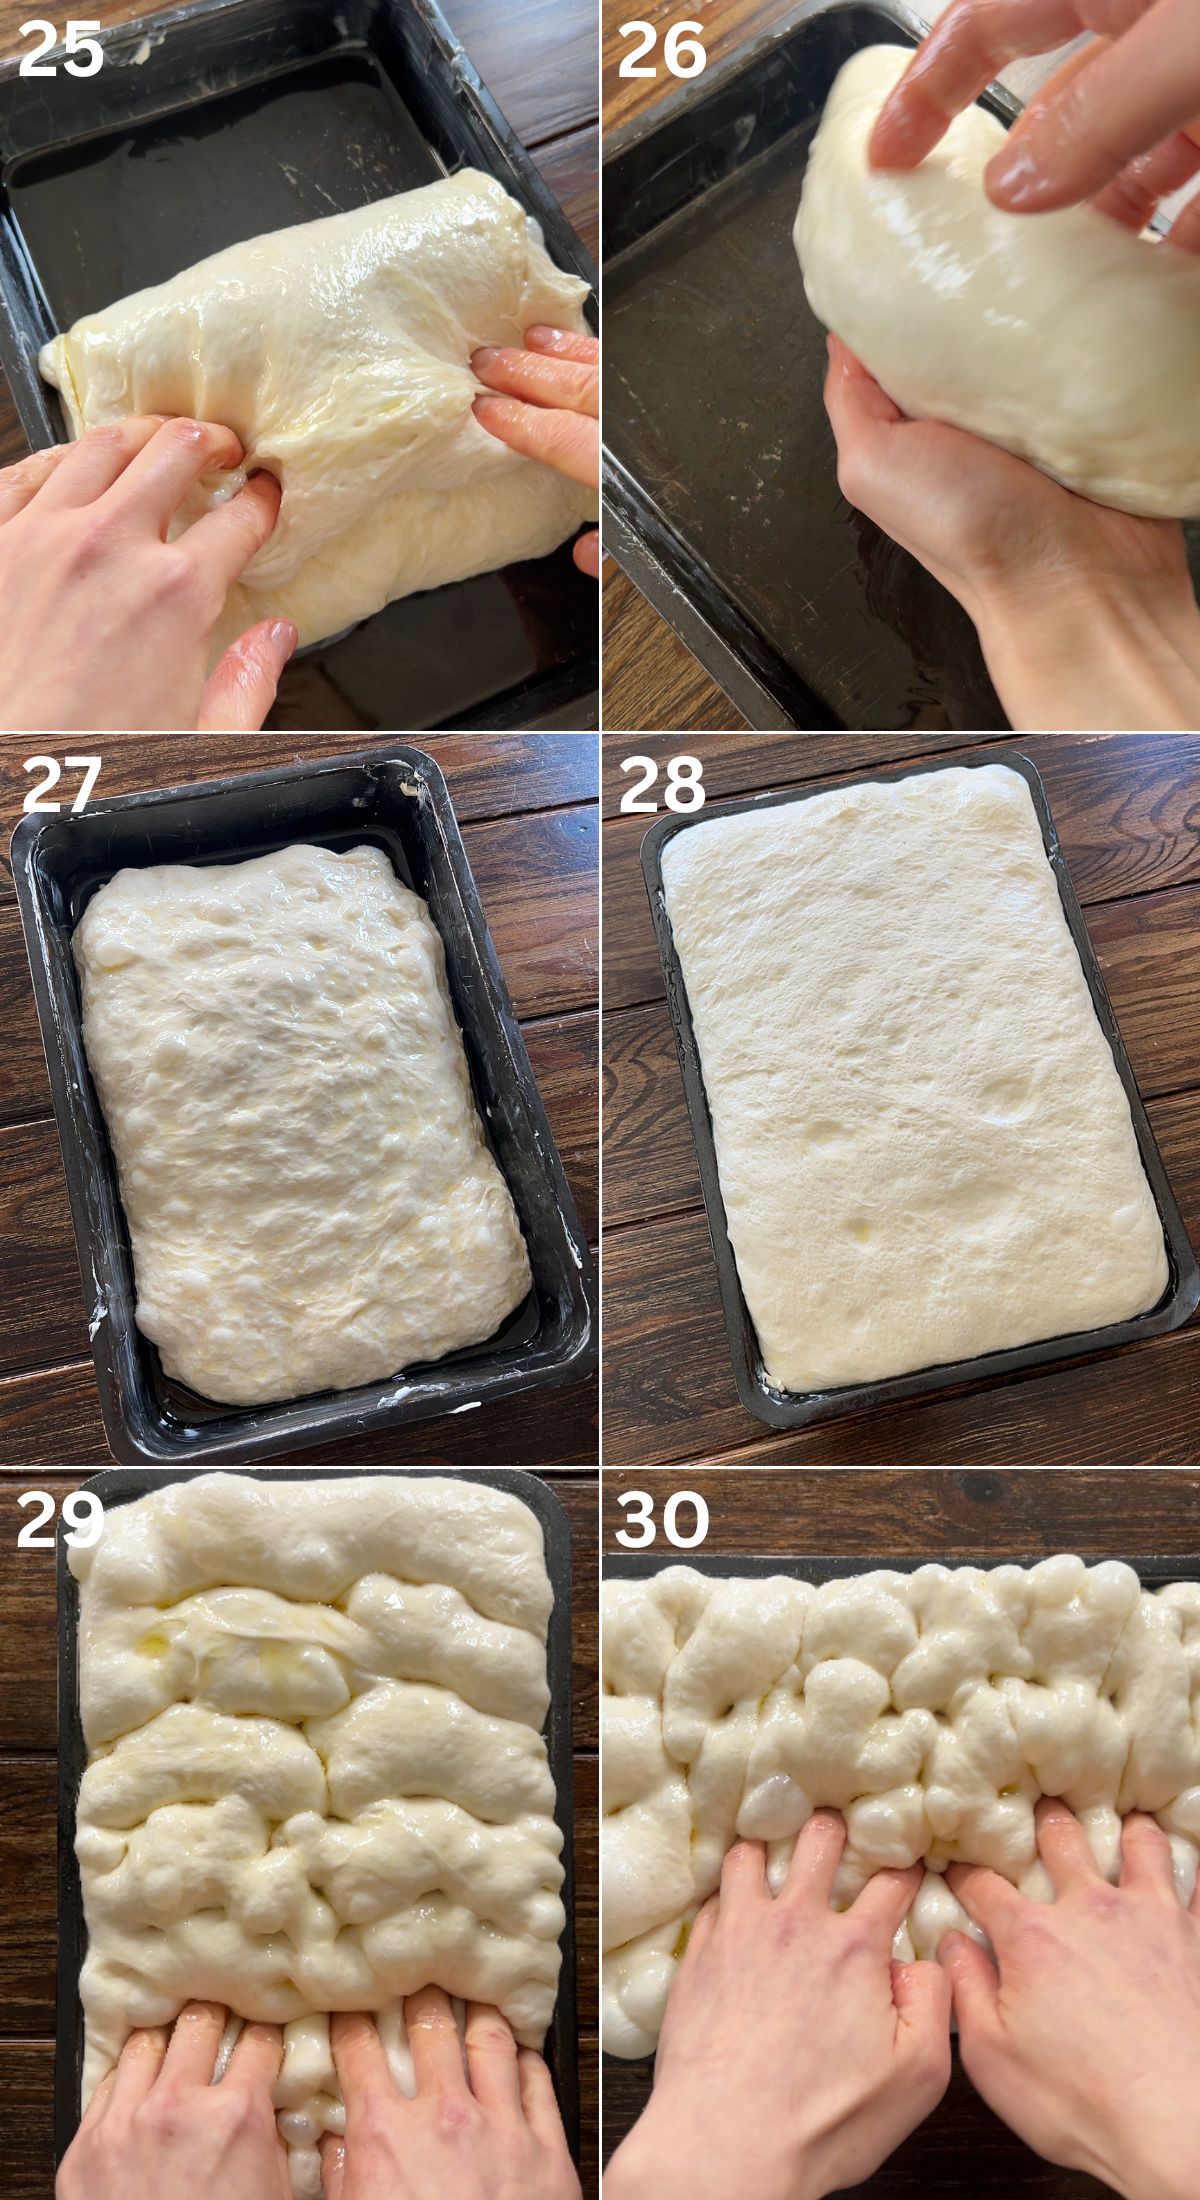
- Oil a pan generously. Turn the dough onto the pan, then fold the vertical side over, followed by the other side. For thinner focaccias, you can also fold the horizontal ends.
- Flip the entire dough over onto itself so the smooth side is facing up. Drizzle more olive oil over the top and coat the surface. Cover and proof for 2–4 hours, or until puffy, jiggly and almost doubled in size.
- Oil your fingers and dimple the dough deeply, reaching all the way to the bottom. Pre-heat your oven at this time.
- Once your oven is preheated, dimple the dough again (without deflating any nice bubbles already formed). I like to dimple it with the pan horizontal. Add your toppings or sprinkle generously with flaky salt.
- Bake at 425–450°F (220–230°C) for 22–30 minutes, adjusting based on your oven. The focaccia is done when both the top and bottom are beautifully golden brown.
2. Direct Cold Fermentation Method (No Stretch-and-Folds)
- In a large bowl, mix the flour, salt, yeast, and water until a wet, shaggy dough forms—this is completely normal.
- Drizzle and coat the dough with olive oil, then cover and let it rest for at least 12 hours, preferably 48 hours and up to 72 hours, depending on your schedule.
- When ready to bake, oil your pan generously. Turn the dough onto the pan. The more oil you use here, the crispier the bottom will become as it “fries” during baking.
- Drizzle a little more olive oil over the top of the dough and cover it while it proofs. Continue with dimpling, adding toppings, and baking as directed above (step 8).
3. Same Day Method
- Increase the amount of yeast and use the same method as the Direct or Stretch-and-Folds dough. Instead of refrigerating, leave the dough at room temperature for 1–1.5 hours. The dough should just about double in size and be very puffy and jiggly.
- Turn it into an oiled pan, drizzle with olive oil, dimples, add toppings, and bake as directed above. This method is perfect when you want fresh focaccia in a single day.
Every method will yield slightly different results but still bake up a delicious focaccia. If you’re wanting to bake on the same day, I highly recommend doing the stretch and fold method to produce some strength to the dough.
VIDEO: Watch How to Make It
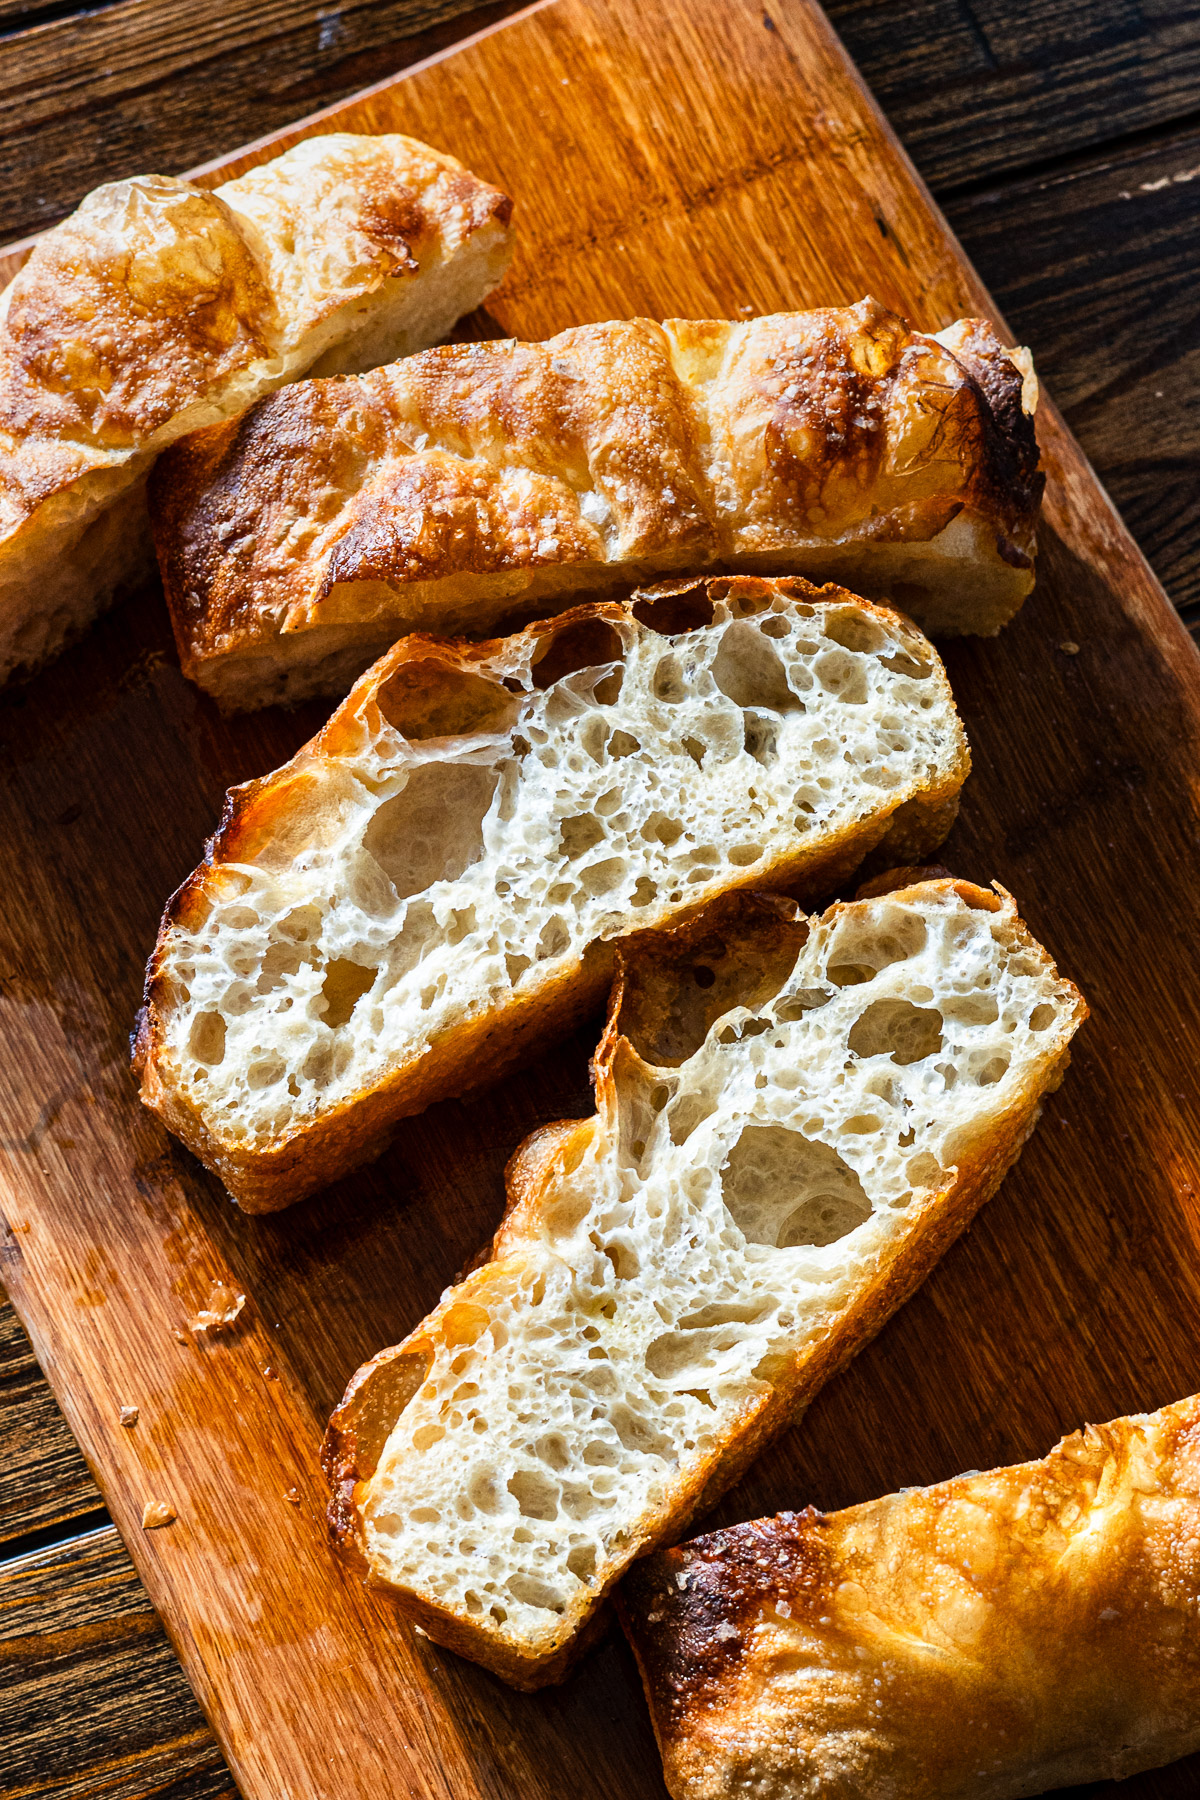
Comparing Different Methods: The Results
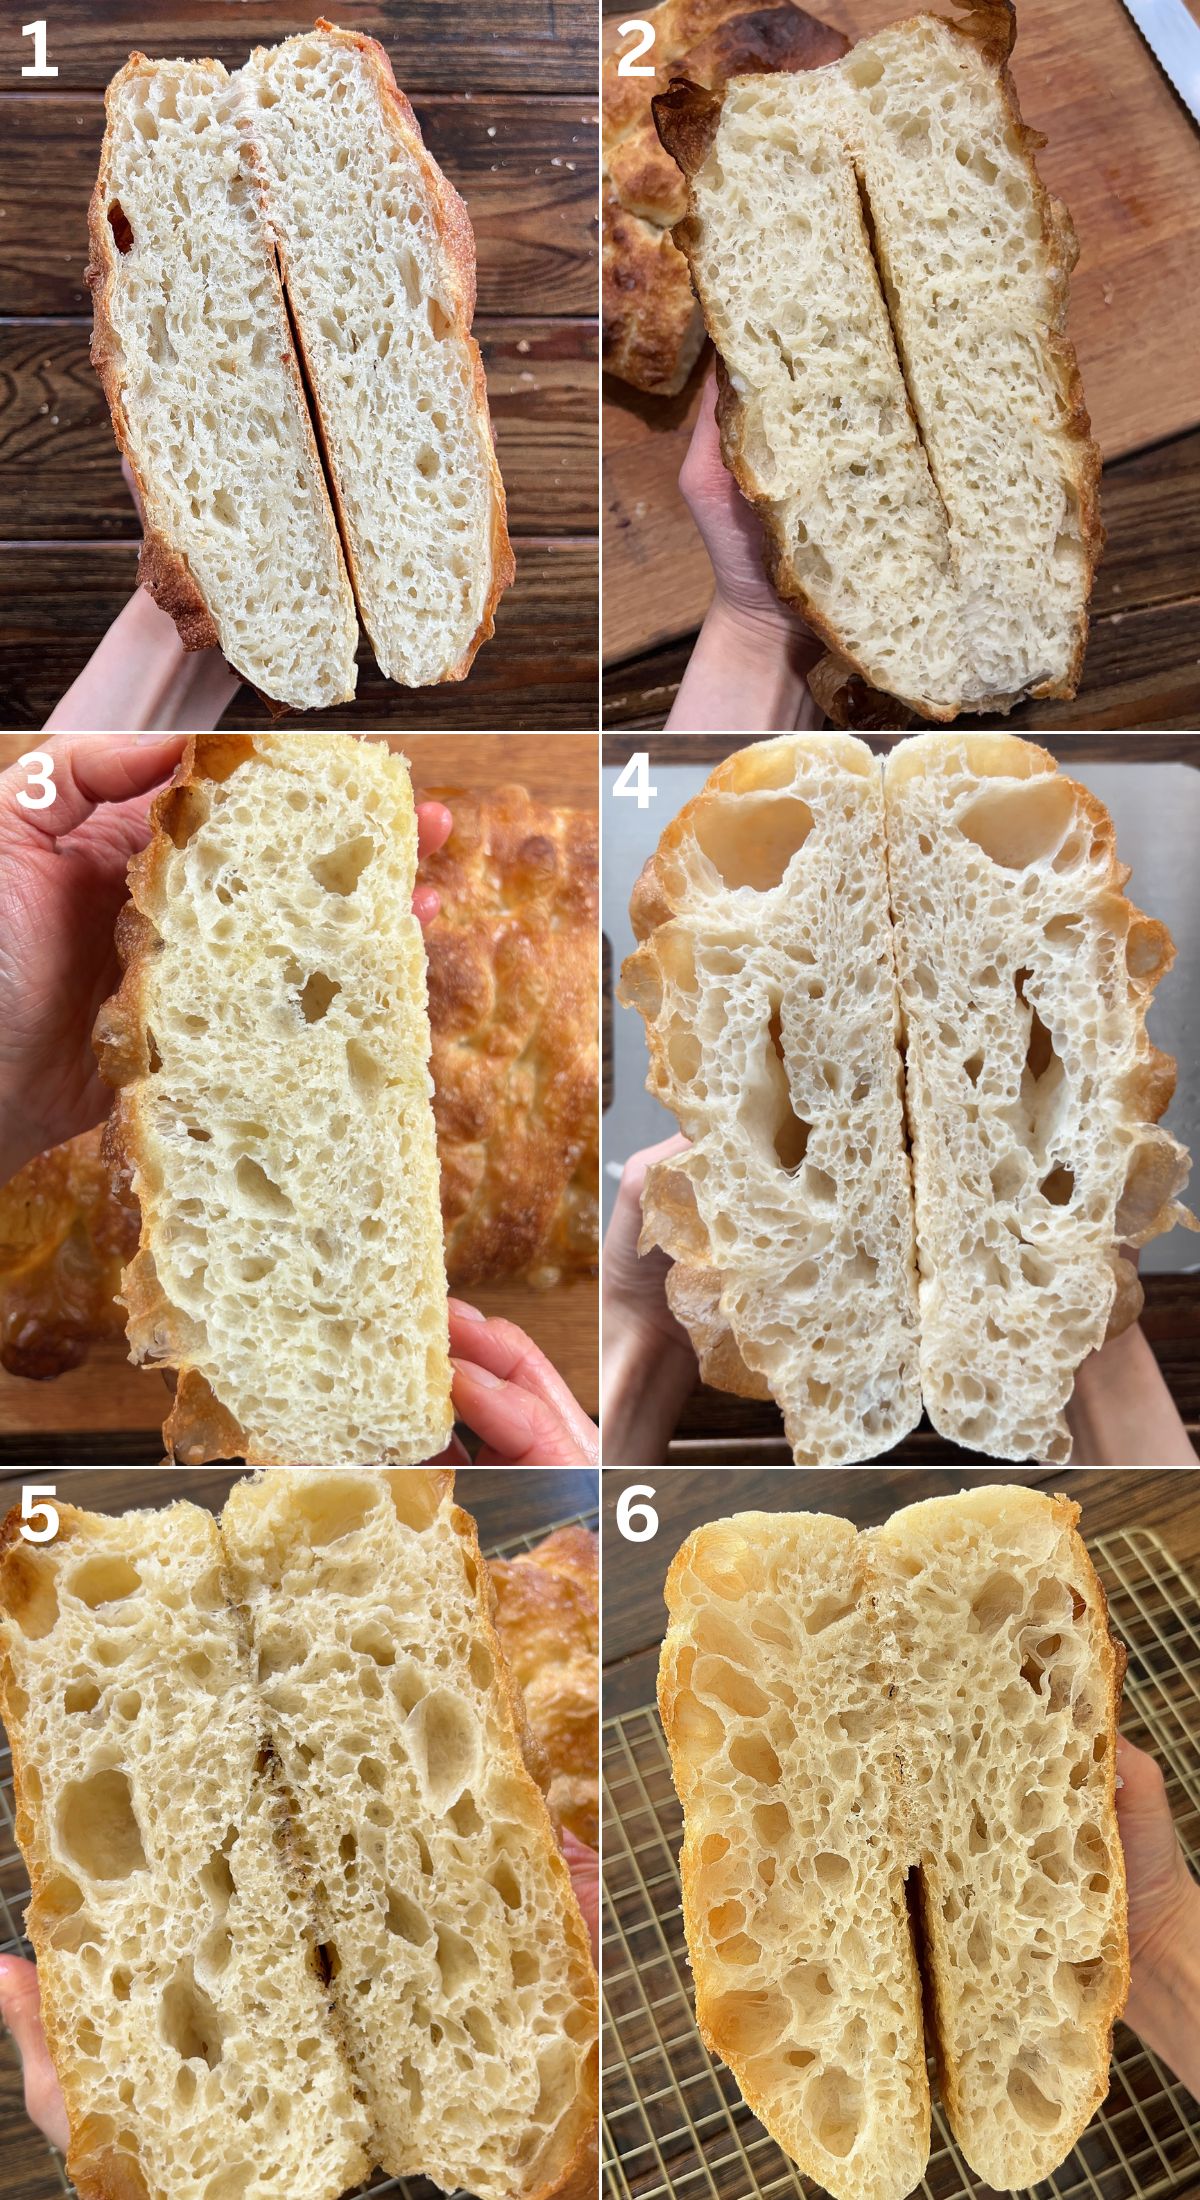
No matter what method you end up choosing, focaccia is pretty forgiving. You can adjust it to fit your schedule and still end up with something delicious. That said, the fermentation time and folding method do make a difference in the final texture, flavor, and crumb structure. To really see how much, I baked this recipe six different ways:
- Direct, no stretch and folds, proofed overnight: Soft, close crumb with acceptable flavor.
- Stretch and fold only, same-day method: Less flavorful, close crumb but very soft — great for sandwiches. Similar to #1.
- Stretch and fold only, proofed overnight: Fluffy and soft with more developed flavor than #2.
- Stretch and fold only, proofed 48 hours: Quite bubbly with great blistering, crisp crust, and deep flavor.
- Stretch & fold + coil fold, same-day method: More open and bubbly than stretch-and-fold alone. Not as flavorful, but still very soft and moist.
- Stretch & fold + coil fold, proofed overnight: Very bubbly, soft, fluffy, and noticeably flavorful.

Lisa’s Recipe Tips
- Measure ingredients with a scale: As always, when baking I recommend using a kitchen scale for the most accurate and consistent results.
- Use a candy thermometer: This handy tool helps you get the water temperature just right and can even check the dough or finished focaccia. It should read about 200°F (93°C) when fully baked.
- Use your senses: This will come with experience but really get to know focaccia dough and the signs it gives you to know whether or not it needs an extra stretch and fold or coil fold, how long to proof and bake. The dough should feel strong yet relaxed when lifted by the time its ready for bulk fermentation. It should look airy, puffy and super jiggly before baking. Take photos and notes as you make focaccia to test and compare little things you pick up on and like or want to change.
- Get to know your oven: Every oven is different, which is why baking time and temperature vary from recipe to recipe. I highly recommend baking a few batches and again, taking notes. I have four ovens at home, and they all bake completely differently—one produces a beautiful focaccia at 425°F for 27 minutes, another 450°F for 24 minutes.
- Use good quality olive oil: Truly, it makes a huge difference, especially if making a simple focaccia without lots of additional toppings.
Serving Suggestions
Focaccia is as versatile as it is delicious, making it perfect for all kinds of meals and snacks. Here are some ideas to enjoy it:
- Sandwiches: Use thick slices for hearty sandwiches or paninis.
- Toast: Lightly toast slices for breakfast or a quick snack.
- Charcuterie Boards: Cut into squares or strips and serve alongside meats, cheeses, and dips.
- Bruschetta: Top with tomatoes, basil, and a drizzle of olive oil for a fresh appetizer.
- French Toast: Yes, focaccia makes an indulgent twist on this breakfast classic.
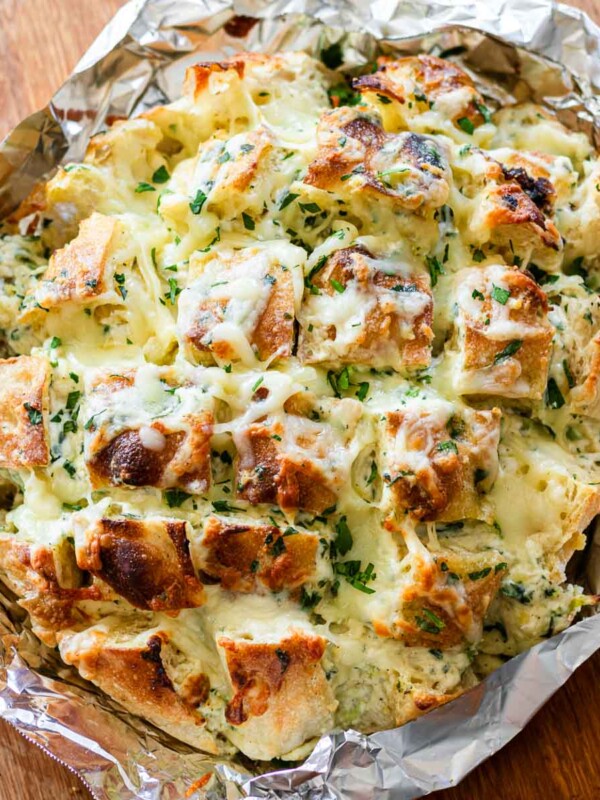
- Pull-Apart Bread: Turn it into a fun, shareable treat—check out my Bloomin’ Cheesy Garlic Butter Focaccia, Cream Cheese Garlic Butter Pull-Apart Focaccia, and Pull-Apart Cinnamon Sugar Focaccia for inspiration.
How to Incorporate Herbs and Other Ingredients into Your Focaccia Dough (Toppings)
The beauty of focaccia is that the variations are endless. There’s no right or wrong when it comes to what you add, but depending on the ingredients and how you want their flavors to come through, there are three main ways to incorporate them:
- Mixed into the dough initially: Small ingredients like chopped olives, sun-dried tomatoes, or roasted garlic can be incorporated right when you combine the dry ingredients—flour, salt, and instant yeast. Toss your add-ins with the flour to coat, then mix in the water as usual. This ensures even distribution of flavor throughout the bread.
- Folded into the dough while transferring to the pan: When moving the dough into your baking pan, you can layer in your ingredients by gently folding them into the dough as you go. After adding a layer, fold the dough over itself to incorporate the mix-ins evenly. This method creates pockets of flavor throughout the focaccia while keeping the dough’s structure intact.
- On top of the dough: Fresh or dried herbs, garlic slices, or other toppings can be placed directly on the surface before baking. Lightly brush or drizzle them with olive oil to prevent burning.
When adding toppings to your focaccia, press them gently but firmly into the dough so they stay in place during baking and don’t burn or fall off. I also like to prep some toppings ahead of time—tossing herbs or delicate ingredients in oil, or cooking ingredients like caramelized onions or roasted tomatoes. This not only intensifies their flavor and controls the juices but also gives a more balanced, satisfying texture in the finished focaccia.
Dessert Focaccia Recipes
- Cinnamon Roll Focaccia
- Strawberry Jam Focaccia
- Brown Butter Cinnamon Roll Focaccia with Brown Butter Cream Cheese Frosting
- Apple Fritter Focaccia (coming soon)
- Tiramisu Focaccia (coming soon)
- Pumpkin Cinnamon Roll Focaccia (coming soon)
Savory Focaccia Recipes
- Miso Butter Focaccia
- Shio Pan Focaccia (Butter Focaccia)
- Chili Oil Focaccia
- Okonomiyaki Focaccia
- Cheese and Garlic Butter Bloomin’ Focaccia (Pull Apart Focaccia)
- Cream Cheese Garlic Bloomin’ Focaccia (Pull Apart Focaccia)
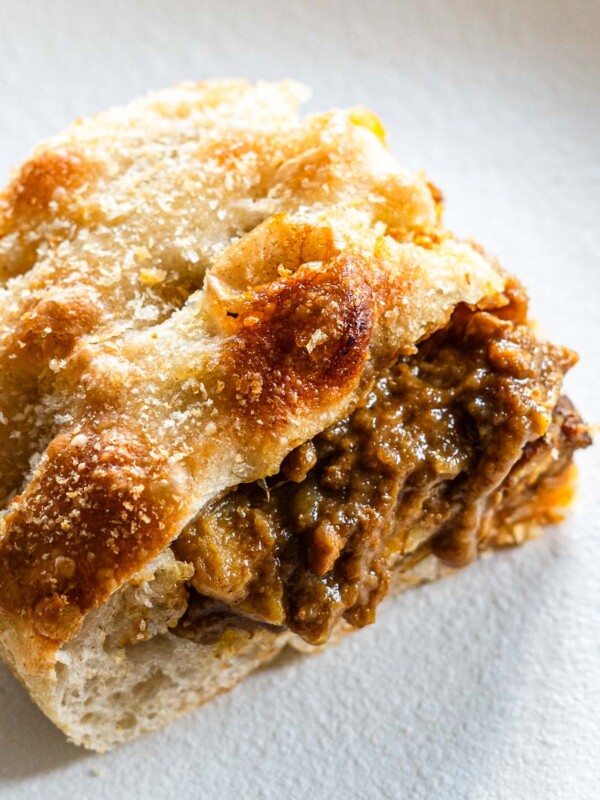
- Japanese Curry Bread Focaccia (coming soon)
- Pizza Focaccia (coming soon)
PS! I’m starting a focaccia series called WHAT THE FOC?! starting on Sept 26th on socials where I’ll be sharing a focaccia recipe every Friday all throughout fall!! I particularly love baking focaccia during the fall so it just felt like the perfect time.
How to Store and Reheat Leftovers
Focaccia is best enjoyed fresh, but you can keep leftovers tasting great with a few simple tips:
Storing:
- Room Temperature: Store in an airtight container or wrap tightly in plastic wrap for up to 2 days. Avoid the fridge—cold temperatures dry out the bread.
- Freezer: For longer storage, wrap tightly in plastic wrap and foil, or use a freezer-safe bag. Freeze for up to 3 months. Thaw at room temperature before reheating.
Reheating:
- Oven: Preheat to 350°F (175°C). Lightly spray focaccia with water, then bake for 8–10 minutes until warmed through and the crust is crisp.
- Toaster: Lightly spray with water and toast on medium for about 3 minutes.
- Microwave: Cover with a damp paper towel and microwave on low for 15–20 seconds to revive softness without drying.
With these methods, your focaccia will stay soft, chewy, and golden, almost like it just came out of the oven.
Recipe FAQ
The secret to a golden, crispy bottom is generous olive oil. When you turn your dough into a well-oiled pan, it basically “fries” as it bakes. Make sure the pan is oiled not just lightly—think enough to coat the bottom and sides—and drizzle a little more over the top before proofing. This creates that restaurant-style deep-gold, slightly crunchy crust while keeping the inside soft and chewy. Additionally, if you have a top and bottom rack in your oven, place it on the lower rack for a more brown bottomed crust.
Dense focaccia usually comes down to one of a few things: underproofing, low hydration, or using a flour with too little protein. Make sure your dough has had enough time to rise, especially with cold proofing, and that your dough is wet and loose enough to develop bubbles. Stretch-and-folds help build structure without deflating the dough, too.
Big bubbles happen when your dough is high-hydration, well-oiled, and given time to develop. Use a wet, shaggy dough, let it cold proof overnight or up to 3 days, and handle it gently when transferring to the pan. Don’t degas it—just turn it and fold it lightly, then dimple it with your fingertips right before baking. The slow rise and gentle handling help those glorious, irregular air pockets form.
If your focaccia collapses after dimpling, it’s usually because the dough was overproofed or handled too aggressively. Dimples should be done gently with the flat part of your fingers, wiggling down to the bottom without pressing too hard or pulling. Also, make sure your dough isn’t too warm from a hot kitchen—this can speed up proofing and make it fragile.
Technically yes, like I did for my quick focaccia recipe. It’s proofed in the baking pan and then dimpled after just the first rise. This focaccia is much softer with less chew and flavour but great for when in a pinch!
Enjoy! If you make this Easy No Knead Focaccia recipe, I’d love to hear what you think! Leave a comment and rating below, and if you share it on social media, tag me on Instagram @Okonomikitchen. I can’t wait to see your creations!
Print
No Knead Focaccia
- Total Time: 35 minutes
- Yield: 1 9×13 inch focaccia
- Diet: Vegan
Description
This No Knead Focaccia recipe is the ultimate guide to bakery-style bread with just 5 ingredients and minimal hands-on time. Make it same-day or let it rise overnight for golden, fluffy focaccia with a crisp crust—easy enough for beginners yet impressive enough for any bread lover.
Ingredients
For a 7×11 or 9×9 inch pan (700 g dough)
- 3 cups (370 g) bread flour (100%)
- 1 cup + 1/4 cup + 2.5 tsp (322 ml) water (87%)
- 1.5–2 tsp (7–11 g) salt (2-3%)
- 1/4 tsp (1 g) instant dry yeast (0.25-1.25%)*
- 3–5 tbsp (45–75 ml) olive oil
- 1 tbsp butter, for the pan (optional)
- flakey salt, for topping (optional)
Instructions
Method 1: Stretch-and-Folds
Day 1: Preparing the dough
- Combine the dough ingredients: In a large bowl, combine flour, salt, yeast, and water with a wooden spoon or spatula. Mix until no dry flour remains and a shaggy dough forms. Cover and rest 30 minutes.
- First Set of Stretch-and-Folds:
- Wet or oil your hands to prevent sticking.
- Grab one side of the dough, stretch it upward, and fold it across to the other side of the bowl.
- Rotate the bowl 90° and repeat.
- Continue 4–5 times until you’ve gone around the dough. Then do a few slap and folds if you can lift the dough without it tearing. Cover and let rest 30 minutes.
- Second Set (S&F or Coil Folds):
- If the dough still feels weak (ie. the dough tears when lifted or pulled) do another set of stretch and folds. If the dough feels developed, perform a set of coil folds.
- To perform a coil fold, lift the middle of the dough so the top edge comes off the bowl, and tuck it underneath. Rotate the bowl so the opposite side is on top, and repeat this motion on all sides. Cover and rest for another 20-30 minutes.
- Third and Fourth Set (Coil Folds): Repeat 2 more sets of coil folds, resting 20-30 minutes between the sets. By the last fold, the dough should feel smoother and hold together better. Drizzle the dough with a little olive oil.
- Bulk Fermentation: Cover and refrigerate for at least 12 hours, preferably 48 hours and up to 72 hours, until double in size, bubbly and airy.
- The amount of yeast listed above is ideal for 48 hours. For 12 hours, use 1.8 g of yeast and for 72 hours use 0.9 g (1 g to round up) yeast.
Day 2: Shaping & Baking
- Prepare the Pan: Spread olive oil over a baking pan generously (enough to coat the bottom). The more olive oil you add here, the more crispy the bottom of your focaccia will be. Butter the sides generously. Alternatively, you can use more olive oil. You can also line it with parchment paper for easy release and clean up.
- Shape dough: Turn the dough out into the pan. Fold the vertical sides over, then the horizontal sides. You can also just fold the horizontal sides over once. Flip the dough over so that the smooth side is facing up.
- Secondary Proofing: Drizzle another 1–2 tbsp olive oil over the top, cover, and proof for 2–4 hours, or until the dough is airy, bubbly, and jiggles when shaken.
- Dimple #1: Drizzle with a little more olive oil if needed or to your liking. Oil your fingers and dimple, using the pads of your fingers to wiggle them all the way down to the pan. I like to dimple top to bottom with the pan vertical.
- Pre-heat the oven to 425–450°F (220–230°C). My oven takes about 20 minutes to pre-heat completely. Depending on your oven, preheat earlier so by the time your second round of dimpling is done, the oven is preheated. ***
- Dimple #2: Rotate the pan so its horizontal and dimple the focaccia dough again without popping any nicely formed bubbles.
- Toppings: Sprinkle with flaky salt and toppings of your choosing, pressing them down snugly into the dough.
- Bake: If you have an oven with a top and bottom rack, place on the lowest rack so that the bottom gets deeply golden and crispy. Bake for 22–30 minutes, until golden brown on top and bottom. Rotate the pan half way if your oven has hot spots.
- Cool & Serve: Remove the pan from the oven. Use a offset spatula or dull knife to wiggle the focaccia out of the pan and transfer to a cooling rack. Let it cool for at least 10 minutes before slicing and serving. Enjoy!!
Method 2: Direct (No Stretch-and-Folds)
Day 1: Preparing the dough
- In a large mixing bowl, combine flour, salt, yeast, and water with a wooden spoon or spatula. Stir until no dry flour remains and a wet, shaggy dough forms. The dough will be sticky and loose—this is normal.
- Drizzle 1–2 tbsp olive oil over the dough and turn to coat. Cover tightly with plastic wrap or a lid.
- Let rest at room temperature for 10–18 hours, or refrigerate for up to 72 hours. The dough should become bubbly, doubled, and slightly jiggly when shaken.
- Continue with Day 2 Shaping & Baking as instructed above.
Same-Day Method
- Increase yeast to 4.6 g (1.25%). Mix dough using either the Direct or Stretch-and-Folds method.
- Instead of refrigerating, let the dough rise at room temperature (20-22°C / 68-72°F ) for 1–1.5 hours, or until nearly doubled, puffy, and jiggly.
- Oil your baking pan generously, making sure the bottom and dough are fully coated. (The more oil, the crispier the crust will be.)
- Transfer dough to the pan, drizzle 1–2 tbsp olive oil over the top, cover, and proof until bubbly and airy (30–45 minutes).
- Dimple with oiled fingers, sprinkle with flaky salt, and add toppings.
- Bake at 425–450°F (220–230°C) for 25–30 minutes, until golden brown.
Notes
- *Use 2% of salt if you plan to top the focaccia with extra salt or salty ingredients. Use 3% for plain focaccia or for less salty ingredients
- **For 12 hours, use 0.5% of yeast and for 72 hours use 0.25% of yeast. Increase yeast to 1.25% of yeast for same day method.
- *** Double dimpling is optional. You can preheat the oven 20-30 minutes before ready to dimple, dimple the dough, add toppings and then bake.
- ***Refer to my tips section for the oven temperature. Every oven is different so I highly encourage you to test a range of temperatures between 425–450°F (220–230°C). Start with a lower baking time and gauge doneness by the tops and bottom of the focaccia (get them golden and crispy!). One of my ovens bakes best at 450°F for 26 minutes while my other smaller oven bakes best at 425°F for 30 minutes. Write notes down as you bake and then you’ll know what temp works best for you!
- Prep Time: 10 minutes
- Cook Time: 25 minutes
- Category: Bread
- Method: Baking
- Cuisine: Italian
Nutrition
- Serving Size: 1 Focaccia
- Calories: 2100
- Sugar: 2 g
- Sodium: 4000 mg
- Fat: 75 g
- Saturated Fat: 16 g
- Unsaturated Fat: 59 g
- Trans Fat: 0.5 g
- Carbohydrates: 310 g
- Fiber: 12 g
- Protein: 43 g
- Cholesterol: 31 mg


Tried this and it has turned out great with fresh yeast (such amazing texture)! For some reason the dry yeast I have been purchasing doesn’t work well and is probably stale. I did notice that dough made with fresh yeast doesn’t seem to create the large bubbles as much in comparison to dough made with dry yeast (like your video). Is there a reason for this or just me?
The BEST focaccia, those that find this recipe, so lucky. You have nailed everything about it 🫶🫶
Baked it and it was delicious! One thing tho, I should i turn on the top heat with the same temperature as the bottom? (230 celcius)
Because it resulted in a burnt top that was super hard 🥹
Or should i just use the bottom heat? Thank you!
Absolutely amazing! I did the 48 hour method, and used a 7×11 pan. It turned out great. I then used the Blooming Cheese and Garlic recipe and it was a hit!! Will definitely be making this again.
This is my second time making focaccia after a first failed attempt with another recipe. It turned out fantastic and I also learned so much along the way. Thank you so much for the detailed write up and all the extra knowledge for a novice baker like me 🙂
I originally saw this recipe on instagram and went through the website for the full details! I am super impressed by the level of detail. I’m new to baking bread so I found this to be extremely informing yet easy to follow. The first time I made this (i used the 48 hour method), it came out perfect!!!
Thank you so much Amy, I’m glad you enjoyed!! 🙂
Super easy to follow and fool proof recipe! Tried method 1 and it turned out so good! Will definitely be remaking this again (and again).
I used this in the joined recipe of a garlic cheese pull apart bread and I added Rosemary and it was amazing. I wasn’t sure about the bread at first because other Focaccia bread I have made was not as thick or dense. But after doing the 2 day process and had the bread in the fridge for at least 24 hours it is great.
The two day ferment is SO WORTH IT. The chew, the crunch 😩 I literally had to force myself to not eat it all in one day. This recipe is so easy to make. The hardest part is the wait 😆
So good! I’ve tried many focaccia recipes, and this is the only one I’ve seen that uses the coil fold and double dimpling methods. It results in a chewier, springier, bubblier focaccia that I love! The shio pan variation is genius. Thanks for this awesome recipe and the clear, detailed instructions!
Hi Nikai,
So glad you enjoyed thank you so much!! 🙂
Lisa makes the best Focaccia!! Crunchy on the outside, warm and soft on the inside and it’s super versitile for any meal 🙂
I tried your focaccia recipe and was impressed by how well you explained each step in detail, making it easy to follow and understand the process. Your clear instructions are a welcome change from the many other recipes I’ve come across, and I appreciate you sharing your knowledge with us….
Thank you so much 🙏🏻☺️❤️
I tried the same-day method and it was so good that I made it again the week after. I loved that you explained every step and any question that came up on my mind there was already an answer for it.😍😍
So glad you enjoyed thank you Mona!
This recipe made the fluffiest and crispiest focaccia ever. I usually struggle with getting a softer but open crumb but didn’t not have an issue here 10/10
I have a slight confusion, so if I was to do the stretch and fold method for a same day focaccia, how much yeast should I use?
Hi Vivian. it says right under the same day method to increase it to 1.25%! So in this case it would be 4.6 grams 🙂 Enjoy!
I used this recipe to make Lisa’s Shio Pan Focaccia recipe that I came across on Instagram. This recipe is so well-written and detailed that as a person who never makes bread, it took a lot of guess work and second guessing out of the process. I love how thorough the post is, from information about the ingredients and equipment to the different methods you can work with. This is the first focaccia dough recipe I’ve ever tried and I honestly don’t think I’ll try any other recipe. It is truly perfection and never fails.
The combination of the stretch and folds, coil folds and overnight rest give this recipe the perfect chew. I love making this in a quarter sheet metal pan for the perfect amount of crispy versus chewy texture. I made this with scallions and five spice powder for a scallion pancake vibe. This is my new favorite focaccia recipe after trying so many other recipes.
Great recipe! This was my first time making focaccia and I’m super happy with how it turned out! Recipe was super easy to follow and the focaccia baked out really well 🥳 Will definitely make it again and can’t wait to try other recipes from Lisa! 😁
This was my first time making focaccia myself AND by hand. This recipe is super easy to follow and the video embed definitely helped with the process (especially for the coil folds). I used my toaster oven to bake this at 430 C for around 25 minutes but I still am looking for that temperature and baking time sweet spot. Regardless of how golden brown the result is, the focaccia tastes phenomenal for the times I have followed this recipe. I am definitely going to experiment more with the inclusions in the future as well (Lisa please post the apple fritter focaccia recipe soon!!!). I also bought a 9″x13″ baking pan recently and definitely will use the formula provided to adjust for future foccs!
This was my first time making focaccia and it came out perfectly with this recipe! I followed the ratios in this recipe exactly for my 8×8 pan and it came out nice and fluffy, about 1.5-2 inches tall! I actually missed the note about the amount of instant yeast to use based on how long you are bulk fermenting, so I just let my dough proof a little bit longer outside of the fridge (after spending the night in there) and it still came out so good.
I did end up making the shio pan focaccia (also from this site), so I only followed method 1 through all of step 1, then switched over to the other recipe from there. Would make again and highly recommend reading all the notes and tips Lisa has written!
I super appreciate the calculator. It is such a a versatile recipe, that I keep coming back to it.
I made this focaccia and it was the best I’ve ever made. Seriously so delicious and the most perfect texture…. I can’t believe I made it. My go to recipe for now on thank you!