
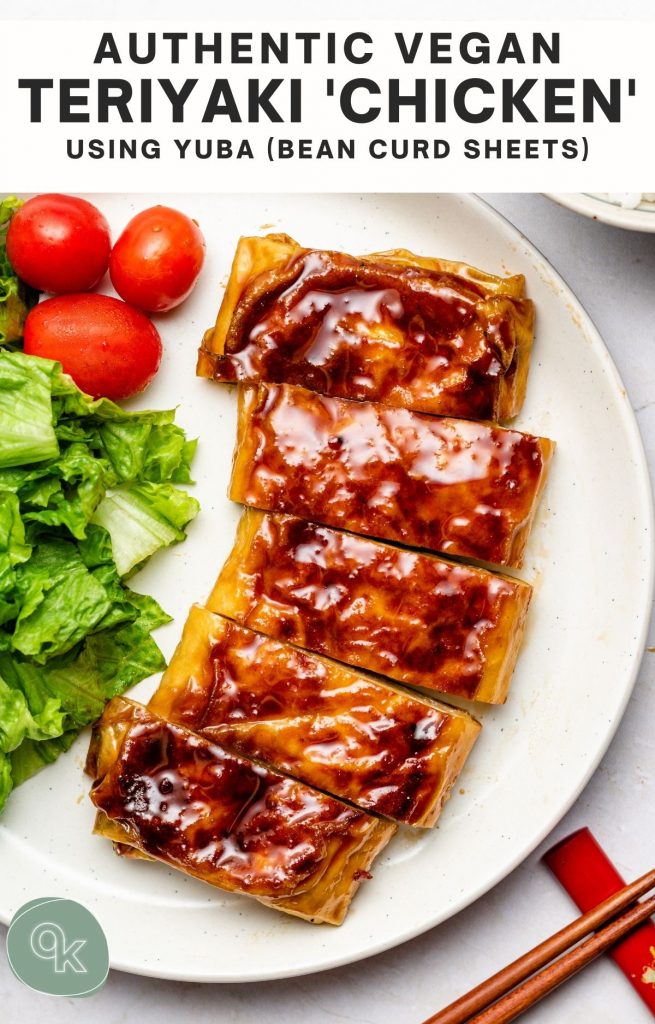
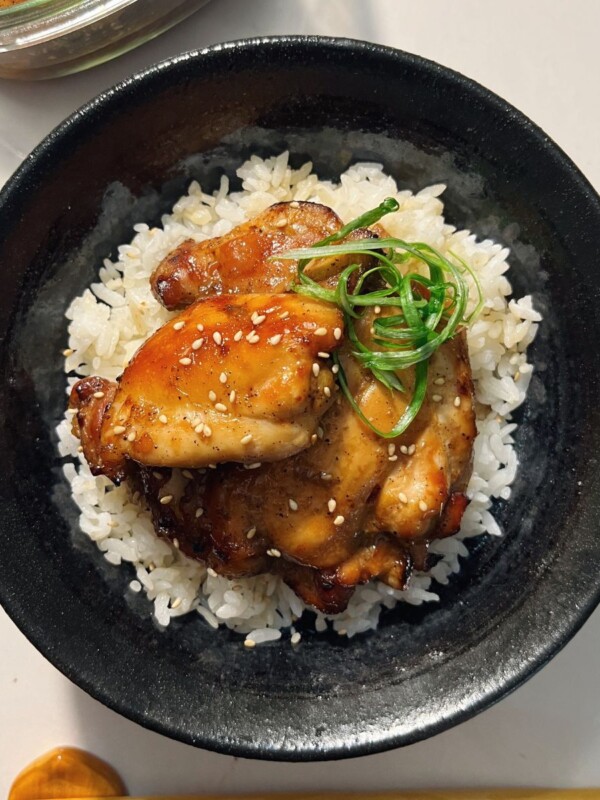
Learn how to make the best Vegan Teriyaki ‘Chicken’ with this authentic recipe prepared using the traditional Japanese cooking method. Made with yuba (bean curd sheets) and homemade teriyaki sauce, this popular Japanese dish is the perfect easy weeknight meal!

Teriyaki Chicken (照り焼きチキン) known as Chicken Teriyaki (チキン照り焼き) in Japanese is probably one of the most well known and well loved Japanese dishes. I’ve seen it on the menu at almost every Japanese restaurant I’ve been to in North America served in a bento boxes, chicken teriyaki rice bowls and as a main entree.
In the past when I’ve tried takeout teriyaki chicken in North America, I always found the sauce to be very westernized in that it sometimes looked dull, overly thick and I could taste other ingredients added aside from the four ingredients used in authentic teriyaki sauce. Since going vegan, I’ve tried a fair amount of teriyaki tofu ‘chicken’ with similar experiences so today, I wanted to share an authentic vegan teriyaki chicken recipe using the traditional Japanese cooking method.
What is teriyaki?
Most people associate teriyaki as the sauce, but teriyaki is actually a cooking method. Teri (照り) means shiny or glossy and yaki (焼き) means cooked over direct heat, so what you get it a ‘shiny grilled’. So the protein is cooked over direct heat and then the sauce is cooked and brushed over it to get that beautiful glossy glaze.

How to Make Authentic Vegan Teriyaki ‘Chicken’
When coming up with a vegan teriyaki recipe, I wanted to keep the result and cooking method very true to the traditional way. Three key elements to delicious teriyaki sauce are:
- the crispy skin with a slightly charred flavour
- true homemade teriyaki sauce
- the beautiful glossy glaze for appearance
The Ingredients
Yuba (bean curd sheets)
Most vegan teriyaki chicken recipes call for a block of tofu so I wanted to take a different approach using yuba sheets. Using yuba as mock meats is common in both Japanese and Chinese vegetarian cuisine because it creates a layers and shreds like meats. The method of folding I used for this recipe was borrowed from my grandma for when she used to make Chinese vegetarian duck. I highly recommend purchasing the large yuba sheets which can be found at Asian grocery stores in the freezer section because it is much easier to work with than the dried version. The dried version tends to break quite easily and is much more fragile. However, if you cannot find the frozen yuba sheets you can also make this with dried yuba sheets. You may just need to add a few more layers and be much more careful when wrapping it.
Teriyaki Sauce
The sauce, we can’t make teriyaki without talking about the sauce!! I really want to highlight that authentic teriyaki sauce only contains 4 ingredients: soy sauce, sake, mirin and sugar. For this recipe I’m using my homemade teriyaki sauce. If you do not have homemade teriyaki sauce on hand then simply combine 9 tbsp of soy sauce, 7 tbsp of mirin, 7 tbsp of sake and 4 tbsp of sugar. The only difference is that the sauce will take slightly longer to thicken because the sugar is not yet dissolved.
What about other seasonings?!
Many recipes call for additional ingredients in their teriyaki recipes, however I do not recommend adding them if you want to make it authentic. Here are some examples and why:
- Sesame oil: is very aromatic and takes away from the true teriyaki flavour.
- Sesame seeds/scallions: disrupts the beautiful glaze and disrupts the flavour of teriyaki, however you of course can garnish with them if you wish.
- Vinegar: DO NOT substitute sake or mirin with vinegar. I have seen some recipes call for vinegar to keep it alcohol free but I would highly suggest substituting it with water and a touch more sugar because vinegar is a completely different flavour.
- Starches and slurry: this is one that really does not belong in teriyaki because it is the sugar that thickens the sauce. Adding starch to the sauce will yield a very dull looking sauce.
- Garlic, ginger and black pepper: Depending on the household and flavour preference, some will add these ingredients. I’ve noted it in the photo above, but it is completely optional and not necessary. If you do decide to add garlic or ginger, please use the juices so that it does not take away from the glaze.

The Directions
Preparing the yuba chicken
- Remove the yuba from the package and cut them into half (you should be left with 8 semicircles). Then cut each one into half again (left with 16 triangular pieces).
- Mix the vegan chicken bouillon with 3 cups of warm water. One at a time, dip the pieces of yuba into the broth mix until is softens. Layer 4 pieces of yuba together.
- Take the left side of the triangle and fold toward the middle. Take the right side of the triangle and fold toward the middle. Then take the bottom side and fold upward twice. Poke holes with a fork and continue to fold upward until you reach the very end (like an envelope). Poke more holes on the outside (this helps when steaming/cooking so it does not puff up).
- Steam the yuba chicken for 5 minutes. This will help soften up the yuba so it’s more tender inside.
- Sprinkle a very small pinch of salt (and optional pepper) on both sides. Dust one side with potato starch (this will be the crispy skin side).
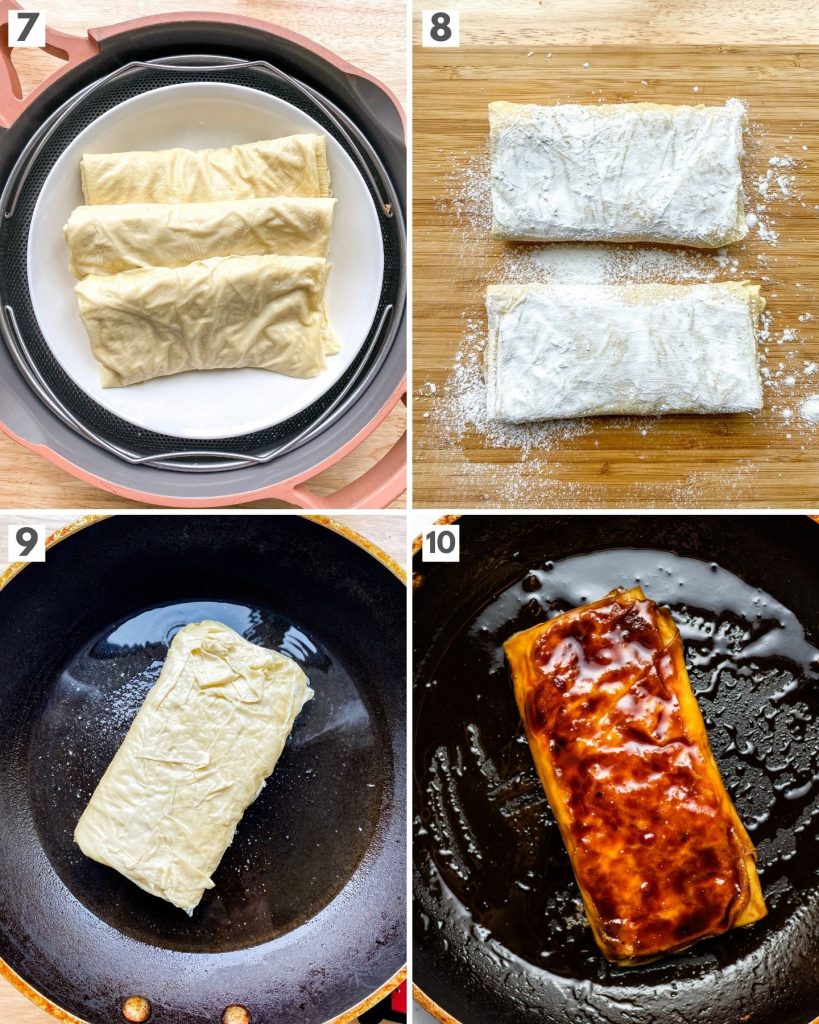
Cooking the yuba chicken
- Add 1 tbsp of oil to a pan and turn on the stove to medium heat. Cook the yuba with the potato starch side down until you get nice and crispy.
- Flip it and then cook for a few minutes until you get some nice browning. Add 4 tbsp of teriyaki sauce per ‘chicken’. Cook until sauce thickens, spooning the sauce over the chicken frequently.
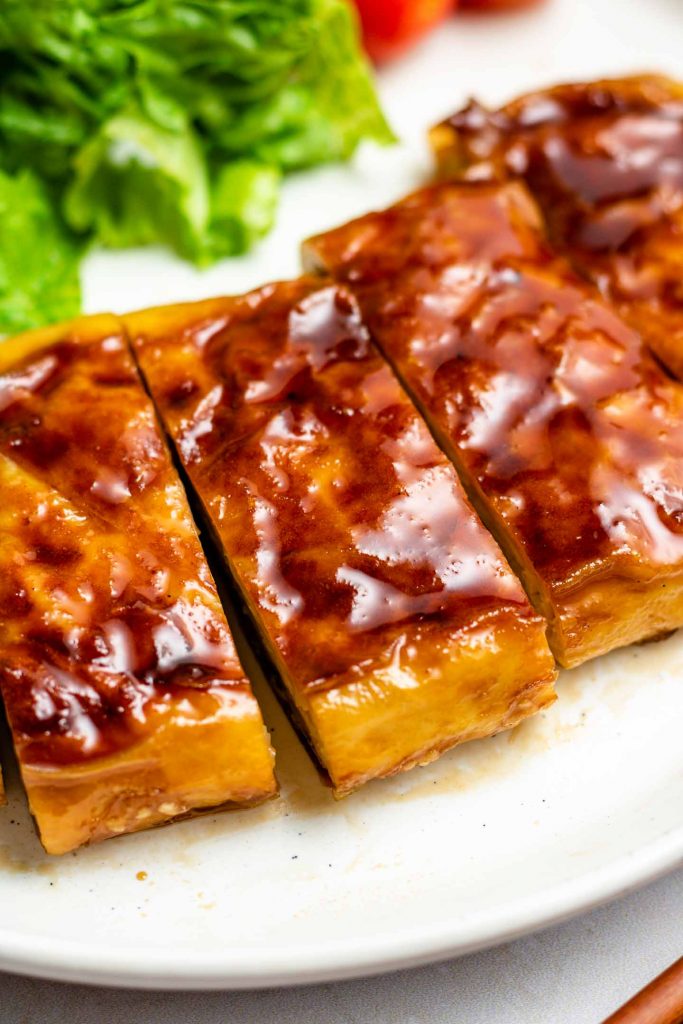
- Once sauce has thickened, turn off the heat. Cut them into bite size pieces. You can brush more teriyaki sauce if desired.

Key tips for perfect authentic teriyaki ‘chicken’
- Making the ‘crispy skin’: Dusting the potato starch over the ‘chicken’ will help mimic that similar charred, crispy chicken texture. Additionally, the potato starch will help the sauce cling on easier.
- Remove excess oil: If the yuba chicken or pan is too oily, the sauce will slide right off. After the yuba is cooked on both sides, blot the oil off the yuba and the frying pan.
- Spoon & reduce the sauce: Once you add the teriyaki sauce, shake the pan a bit. Then tilt the pan with the heat close to the burner and spoon the sauce several times. The sauce will begin to thicken (it will start to bubble) and it’ll start glazing the entire piece of ‘chicken’. Once you get a nice glaze over the yuba chicken, remove from the heat and transfer it to a cutting board.
More delicious teriyaki recipes to try:
- Vegan Teriyaki ‘Salmon’ Fillets
- Teriyaki ‘Chicken’ Donburi (Rice bowls) – coming soon!
- Yakiyuba (Yuba skewers in teriyaki sauce) – coming soon!
SAVE IT FOR LATER! ↓
If you recreate this Vegan Teriyaki ‘Chicken’ recipe let me know how you liked it by leaving a comment and rating below or by tagging me on Instagram @Okonomikitchen, I love seeing all of your tasty recreations!
Hungry for more? Be sure to subscribe to my newsletter and follow along on Instagram, Youtube and Pinterest for more deliciousness!

Vegan Teriyaki Chicken
- Total Time: 35 minutes
- Yield: 3 servings 1x
Description
Learn how to make the best Vegan Teriyaki ‘Chicken’ with this authentic recipe prepared using the traditional Japanese cooking method. Made with yuba (bean curd sheets) and homemade teriyaki sauce, this popular Japanese dish is the perfect easy weeknight meal!
Ingredients
- 4 pieces of large frozen yuba sheets*
- 1 tbsp vegan chicken bouillon mixed in 3 cups of warm water
- potato starch, for dusting
- 1/2 – 3/4 cup homemade teriyaki sauce**
- salt
Optional
- 2 knobs of ginger (2 inches), juiced
- 4 garlic cloves, minced & juiced
- pepper
Instructions
Yuba Chicken Preparation
- Cut the large pieces of yuba into half. Then into quarters. You should be left with 16 triangular pieces.
- One at a time, dip the pieces of yuba into the broth mix until softened.
- Layer a total of 4 yuba pieces together. Take the left side of the triangle and fold toward the middle. Take the right side of the triangle and fold toward the middle. Then take the bottom side and fold upward twice. Use a fork and poke holes in the yuba. Continue to fold upward until you reach the very end (like an envelope). Poke more holes on the outside of the ‘chicken’.
- Bring a pot to a boil. Add the yuba chicken on a plate and steam the yuba chicken for 5 minutes.
- Add a small pinch of salt (and optional pepper) on both sides of the yuba chicken. Dust one side with potato starch (this will be the crispy skin side).
Cooking Teriyaki ‘Chicken’
- Over medium heat, add 1 tbsp of oil (or enough to coat the pan). Cook the yuba ‘skin side’ down until you get nice and crispy.
- Flip it and then cook for a few minutes until you get some nice browning. Add 4 tbsp of teriyaki sauce per ‘chicken’. If adding ginger or garlic, add desired amount of the juices with the sauce. Cook until sauce thickens, spooning the sauce over the chicken frequently.
- Once sauce has thickened, turn off the heat. Cut into bite size pieces, brush a bit more teriyaki sauce if desired.
- Serve with vegetables of choice and rice, and enjoy!
Notes
- *frozen yuba sheets can be found in the frozen section of Asian supermarkets
- **if you do not have homemade teriyaki sauce on hand, combine 9 tbsp of soy sauce, 7 tbsp of mirin, 7 tbsp of sake and 4 tbsp of sugar. The only difference will be that it takes slightly longer for it to thicken because the sugar is not already dissolved.
- Nutritional Information Disclaimer: Nutrition information is a rough estimate calculated on an online tool (Cronometer).
- Prep Time: 25 minutes
- Cook Time: 10 minutes
- Category: entree
- Method: stove top
- Cuisine: vegan, japanese
Nutrition
- Serving Size: 1 serving
- Calories: 372
- Sugar: 12.9g
- Sodium: 865mg
- Fat: 17.1g
- Saturated Fat: 2.9g
- Unsaturated Fat: 3.8g
- Trans Fat: 0
- Carbohydrates: 31g
- Fiber: 1.5g
- Protein: 24.4g
- Cholesterol: 0
Okonomi Kitchen is a participant in the Amazon Services LLC Associates Program. When you purchase something through my amazon affiliate links, I earn a small commission that helps me produce consistent content at no cost to you. Thank you for supporting my plant based kitchen!


I make this one quite often! The taste, the texture… to me it has all the qualities of Japanese dishes, and my (intransigeant) husband really really likes it. It’s perfect for meal prep too.
Thank you Lisa!! Once again you nailed it!
I made this recipe the other week. I am not vegan, so new to cooking this way. I do love cooking with Tofu, but had never tried the sheets before. Actually didn’t take too much time, but came out really great. My only recommendation is to not use the sauce in the pan if it’s too hot, the sugar kind of burned, so just be careful with that. I gave the first bite to my wife, and she was stunned. She approooooved.
This recipe is supers! First time bought yuba sheets and made it by follow the clear instruction. It was delicious. No matter match with rice or my green vegetables and tomatoes. Thanks for sharing the recipe with us. Will try make more dishes next round.
This dish was so easy to make and so tasty! I always have dried yuba sheets and sticks on hand at home but never heard of this technique of folding, steaming and then frying. It’s awesome! A great dish I’m sure to use over and over again! Thank you for sharing! Can’t wait to try it in the katsu version!
Thank you for your reels so clear that they make me think I will be able to prepare by myself. My yuba chicken was delicious, crispy and juicy. Thank you! ❤️
never thought to use yuba for a meat-like texture but i’m happy i did 😍 it was so delicious! i might even like using yuba more than tofu blocks now! thank you 😭❤️
Thank you for your reels so clear that they make me think I will be able to prepare by myself. My yuba chicken was delicious, crispy and juicy. Thank you! ❤️
Super delicious and so easy to make! Mine was a little salty but that’s probably because I used my bouillon water to steam- definitely don’t do what I did. LoL
The flavor and texture was sooooooo good!!! I’ll definitely be making this again!! I also made her recipe for teriyaki sauce! So quick and easy!
I loved making this recipe and cooking yuba for the first time! This blew me and my friend away! Definitely try this recipe even if you are short on time! Thank you!!
I made this for my partner and I for dinner and we both loved it! I had tried yuba at restaurants but never made something using it successfully myself. This recipe was so fun to make as well, all the steps are so intuitive and easy to follow.
Thank you for sharing and creating this recipe, Lisa!